:: Diary - February 2024 ::
:: Friday, 2 February 2024 ::
My wee car loves me so much it doesn't want to let me go! I had a full "Christine" moment when I couldn't get out!
But let's start at the beginning for today. Since I changed the oil, the engine has been clattering like a bucket of bolts falling down a pit shaft
when you first start it. It's the hydraulic tappets taking ages to fill up. I used a 10W40 oil because I had it going spare, but I think it's too
thin for a 30-year Ford engine that's done 100,000 miles.
I also noticed that the filler plug is weeping (and dripping) so I need to take out the plug and put on a new washer.
So I went out and bought some 20W50 and we'll sling that in. Plug out, drain oil, leave the new filter, new washer, plug back in, refill with oil.
Start it up, ad after the first 2 seconds it's a lot better.
While I'm under there I spot the gearbox filler plug. Some have a square drive but mine is a hex. I find a hex key socket and ratchet, and remove
the plug. Then I rig up the same oil pump system that I used for the diff, and pump around 100ml of oil in - I'm not sure, I used a lot more but
there's some still in the pump, some on the floor and some on me. Plug back in and tightened - job jobbed!
Next - it's dry outsside so I put all the wheels back on and lower the car i move the jack system out of the way, and take it out for a wee test.
First the brakes at around 20mph outside the house - Yep those are working ok. Then I go a wee bit faster and try again to make sure they're not
pulling. All seems to be ok, so I head back home.
Stop the car, pull the door handle and - nothing! It's detached at the lock - probably joggled out when I was refitting the door trim. Fortunately
I can reach out to the outside handle. Then I dismantle the door again and make sure that the interior handle is properly connected while I
manoeuvre the door trim back on.
Final job - I stuff all of the electrics, fuses, relays and the ECU, back up behind the glove box, and replace the cover in the footwell.
All sorted!
:: Tuesday, 6 February 2024 ::
It’s February, it’s pissing rain and blowing a hoolie, so there was no TVR driving to the meeting on Sunday! Instead, I meet up with Dave, Jim and
Eric and go through in one car.
We talk about the usual stuff - cars, wheels, floods, brakes, the cerbera, quickjack lifts, wee Daihatsu Rockys, holiday plans, recent TVR work,
home decorating, ailments (of which there are an increasing number between ourselves and families) and all the other random stuff you talk about.
It’s great.
The dinner at the hotel is really good - I opt for steak and Guinness pie, with a wee toffee pudding just to wash it down. I really enjoyed that too!
On to today - I noticed when I was putting the wheels back on the car that the back ones were turning slightly even with the handbrake on. The
handbrake lever is a wee bit tight between two notches - 3 clicks and it doesn’t hold, 4 clicks and it does, but you need to stand on the seats and
use to hands to get it over that fourth click.
You can’t get to the handbrake adjuster with the exhaust in the way (at least I can’t) so I start by taking the exhaust off. I hold up the front of
the exhaust with an axle stand, and remove the 6 wee nuts and bolts holding the “hockey stick” pipes onto the bottom of the cat replacement pipes.
Then I put a wooden box under the back and remove the single bolt under the number plate, and then the two big nuts holding the silencer up. That
lets me jiggle the whole system down off the supports and onto the floor.
The left hand hockey stick is really loose and shows signs of blowing on the top, where it’s hard to see from underneath. The clamp won’t tighten,
so I take the joint apart and try to restore both ends to a shape that’s close to round. A wee bit clamping in a vice to close it up a bit, and I
put it back with exhaust sealer - much tighter!
Back to the handbrake - I loosen the adjuster by one turn and pull the lever - better but not quite there. Another half turn and it clicks easily
to “4” and holds. That’ll do!
Finally I refit the exhaust onto the box and axle stand, and bolt it up, then tighten the clip at the hockey stick joint. That feels much more solid!
I notice that there’s a bead of brake fluid running down the front of the servo. Is it leaking or is it the last of any overspill from refilling the
reservoir the other day? Don’t know, but I’ll be keeping an eye on that!
No photos today because I just found out that my phone hasn’t been charging for the last 2 days so was down at 5%, so it was on charge during this
morning's exploits!
:: Wednesday, 7 February 2024 ::
Just a couple of photos of yesterday's progress!
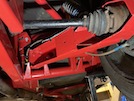 Rear suspension, all cleaned up after the handbrake adjustment!
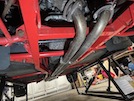 Here's the refitted exhaust - you can see the 6 nuts and bolts at the top, clamping to the downpipes, and also the two joints to the main system.
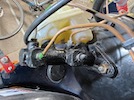 This is the brake master cylinder - it looks wet, but that's because it has been painted, it's not brake fluid!
I was looking at the cost of replacement master cylinders last night, just in case. I found that there are at least 3 different master cylinders
fitted to S Series cars - one is from SAAB and is easy to identify because it has the remote reservoir. The other 2 have the reservoir on top of
the cylinder, and are both from the Mk3 Ford Fiesta, and are subtly different.
Advice on forums is to buy from TVR parts specialists, to make sure you get the right one. This advice is fine, as long as you know which one you
are looking for in the first place, and their prices aren't cheap...
You need to make sure that you get one with a 22.2mm piston bore, and for a car without ABS. Then the main differences are:
Ford Part No 6170668 or equivalent - 2 x M10 threaded ports, 2 x M12 threaded ports plus the reservoir ports on top.
Ford Part No 7117260 or equivalent - 4 x M10 threaded ports, plus the reservoir ports on top.
Mine is the bottom one - all the brake line connectors are the same size (probably because mine was a conversion from SAAB about 10 years ago).
If you know all that, then it's possible to buy a new master cylinder a lot cheaper than from the specialists - but don't take chances with brakes,
if you're not sure, get proper advice, albeit not necessarily from some "specialists"...
Finally for today - a very long-standing job that I have never fixed properly - the driver door mirror. I don't have the original "bunny ear"
mirrors that look good but in practice, are pretty bloody useless unless you tilt the passenger side one upwards so that you can even see it. I
don't have the later mirrors from the Citroen CX that at least let you see. No, mine are some "in-betweeny" thing that I haven't seen on anything
else except some early TVR Tasmins. There's no part number moulded in, so I don't know where they came from...
Anyway, the point is that the driver side mirror is slightly loose. It's fixed to the door well enough, but the fixing of the mirror to its mount
has very slight play, so when you shut the door, the mirror turns inwards slightly. Every single journey begins with a reach out of the window to
push the mirror back. I have addressed this for the past 15 years or so by wrapping a black plastic tie-wrap around it a couple of times and pulling
it tight, but that only lasts so long before it loosens and I need to put a new one on.
Well, today I decide to see if I can do something more permanent. I remove the mirror from its mount (a single Allen key) and have a look. I can
see up inside the mirror "stalk", there seems to be a single big rivet thing that you can't tighten, mounted through a wee plate onto the plastic
mirror. The wee plate is turning very slightly and has dug into the plastic, creating some play. I can't see how to get that apart, but all I need
to do is remove that play... So I cut two tiny pieces off the end of the old tie-wrap that I just removed, turn the mirror to where I want it to
be, and superglue them into the edges of the wee plate where the plastic has veen scraped away. Give it a few minutes and voila! One solid mirror
mount!
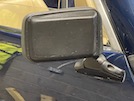
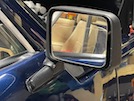 Fix it back on the door and for the first time that I can remember, I don't need that tie-wrap!
:: Thursday, 8 February 2024 ::
It's too bloody cold to work in the garage today. In any case, I have other work to do.
I did notice, though, that the "events" page over there on the left only goes up to Burghley 2019, so there's no events listed since Covid
restrictions were lifted - a situation which I have rectified today by adding some photos from events we attended in 2022 and 2023.
Happy days!
:: Saturday, 10 February 2024 ::
One good thing about rainy weather - you don't half get a lot done indoors, whether that be work, things around the house, or playing with you
favourite sports car in the garage!
I start by cleaning the car with detailer - it's not too dirty, but a lot of surface dust and wee water marks from the last time I used it.
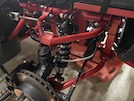 The I decide to take off the front wheels and clean up the front suspension, even although nobody sees it, because I don't have the handbrake to
bonnet catch connection that Dave does.
While the wheels are off, I clean up the backs of the wheels (that you can only see through the spokes) just because it seems like a good idea.
Then a wee spray of tire shine to finish them off.
While I have the tyre shine out, I also clean up the rubber bumpers on the 4 corners of the car - it's a lot easier when the car is up at a decent
height!
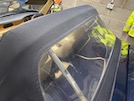 My next wee job is cleaning the roof, starting with the collapsible "targa hood" section. I use the Autoglym cleaning kit - I found 2 while I was
tidying the garage onto its new shelves. Then I move on to the panels.
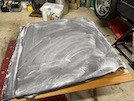 First you spray on the cleaner and spread it in with a rough sponge in the kit, and rinse it off.
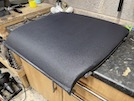 Then while it's still damp, you spread on the waterproofer with a different sponge, and leave it to dry.
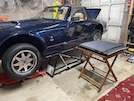 Here's the second panel beside the car. While it's drying, I stick down that rubber seal along the edge.
While I'm at it, I notice that the rubber seal along the bottom of th window has come away from the top of the door for about 4 inches, so I stick
that down too.
While I've been doing all this work over the last fortnight or so, I've had a bit of an epiphany - this is why I bought the TVR in the first place
- it's not just the driving, it's the hobby of playing with it, fixing it, improving it - that's all part of the ownership experience. I think it's
probably in better fettle than it has ever been in the 21 years I've owned it (which means it'll probably break big style the next time I take it
anywhere...).
I don't have the same with the Porsche (partly because it rarely needs anything doing) and certainly not with the Chevy, because it rarely gets used.
The TVR is the car to keep, not just for the car but for the experiences and friends it has brought me over the years.
So I'm going to have another go at selling the Chevy in March. I think I'll probably sell the Porsche too - it's a great car, but I've now had it
11 years and it's time to move on to something else I think. Don't know what yet, I have various things in mind depending on what day it is, what I
had for breakfast, what fits in my garage, and various other random factors...
:: Sunday, 11 February 2024 ::
I know that I've been busy almost daily with the car, but in case you're wondering - my wife is still alive and she's still here!
In between all the car stuff, we've decorated our hall, landing and stairs, tidied up a lot of filing, sorted my company accounts (my financial year
finished on 31 January), and still had time for days out, collecting a parking ticket, and various other adventures. No sitting about here!
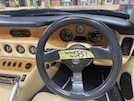 I did spend some time on the car this morning - beginning by putting all the wheels back on, ad leaving a reminder for the terminally bewildered
(that's me) to tighten them up when I get the car back on the ground, before I go anywhere!
The rest of the time I just spent cleaning - the window glass, the rear screen and wee bits around the engine bay. I also gave the whole car a wee
wash and wax spray and wipe.
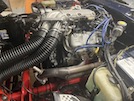
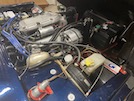 It's all looking not too bad!
That's all for today though!
:: Thursday, 15 February 2024 ::
I've been busy with another website for the past few days, so haven't updated this one.
Why you may ask? Or you may not - but I'm going to tell you anyway.
I have a wee company that counts cars and designs junctions and guesses estimates how junctions are going to work if you add traffic on to
them. My wee company has a website, and 12 years ago I paid a fair bit of dosh to get a new one designed by a propwr web developer. That's hosted
on a server that isn't mine, that I pay a fair bit of dosh every year to keep there. I was abale to update the website easily through an administrator
console on that server. So far so good...
The web developer that built the website went out of business about 3 years later. No more admin console, no more website updates. Fortunately,
my wee company does exactly the same now as it did then, so no great need to update anything - I don't publicise the jobs I'm doing or the clients
I work for because I don't need to brag - I'm brilliant enough as it is, and everybody already knows that...
Then about 2 weeks ago, I found out that my company website had disappeared. They said that it had been written in an old version of PHP and wasn't
compatible any more, so needed to be updated. Cue new web developer... the first one can't do it because it wasn't written in Wordpress. He's as
much use as a chocolate kettle. I'm currently waiting for another one to contact me but he's on holiday this week...
Now I don't want to be spending money on a new website, because I'm too bloody old dto be in this business forever. So I though I would have a look
at this myself, seeing as the hall decorating is finished...
First, let me explain something. These website building programs like Wordpress etc, or languages / formats like PHP, are all very fancy - they let
you build dynamic websites that build themselves from components, depending on what the viewer or customer clicks on. When you go on ebay, for
example, they dont have a separate page for every item that somebody is trying to flog - they have a database of all that shit, and the page fills
the page in, depending on what item your drunken fingers think you need. All very fancy, but I don't need it.
If that sounds like I know what I'm talking about, I'll let you continue with that notion...
In comparison, this tvrgit website is very simple, written line-by-line in crayon, on bits of recycled paper, by a 4-year-old with a basic grasp of
what words go where. It's like using an abacus when everybody around me is on supercomputers. It's feckin' slow, it's a wee bit limiting, but it
works! Mostly.
And it's free!
Anyway, back to the company website - I manage to download some of the old discarded pages from a website called wayback machine - it is basically
a website where you can "wind back" most other websites to a certain date - I've used it before to show that a website now says something different
from what it said before.
So I have worked on and off over the past 4 days, trying to replicate my own old company website (close enough) so that I can host it myself (on
the same server as this one) and then update it when I want to (the same as I can update this one). It's getting there but still a way to go... But
once you have the basic format for the first page (which is totally different from this site), the other pages should just fall into place. It's a
long time since I started a new website from scratch though!
In the meantime, back in the real world, I haven't done anything else to the car except take it off the quickjack, and tighten the wheelnuts (yes,
I remembered!) I'm looking at somebody else's car this weekend (broken spring I think) so I need the jacks!
I thought that I might show you these jacks in a wee bit more detail - a couple of people have asked me about them.
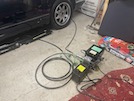 This is the electric pump / motor that raises and lowers the jacks hydraulically. The hoses disconnect so that you don't trup over them when you're
working.
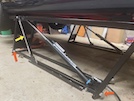 This photo shows the jack in its high position. The bar shown by the yellow arrow braces it up when it's not under hydraulic pressure, so to put it
down, you have to lift it slightly first, disengage the lock on that bar on each side, then let it down.
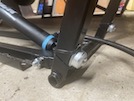 I made a wee modification though. When it's down, it's hard to move around on the floor - they are bloody heavy. To help manoeuvre them into place,
I added 4 wee roller bearings to each one - you can see them shown by the red arrows in the last photo. They lift off the ground when the jack is
"up" so they don't ever carry the weight of the car.
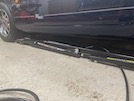 With the jack down, you can see the roller bearings on the floor, lifting the jack frame just a fraction so you can roll it around.
:: Sunday, 25 February 2024 ::
I've been on holiday! Nowhere exotic, but we went to Liverpool for this last week, and really enjoyed it - I have never been there before and it was
definitely worth the visit. However we're not a travel website so enough about that...
I got my business website sorted - I finished it and uploaded it last week, so I can access it if I use the full web address. I can't get my domain
name to point to it, and I don't know why - it's hosted and set up exactly the same way as this one, and the one for the TVR S Series, and the
Chevrolet one, so I no unnerstan. I think there's some setting with the old web host that's stopping me accessing it. However we're not an IT website
so enough about that...
While I was away, I got a renewal quotation for insurance for the Porsche - 40% up on last year. After a single meerkat search, I have the renewal
down to around a 5% increase - with the same company! They say they are different, but the second company is owned by the first company, but also
trading as second company. Car insurance is a con, it really is... However we're not an consumer advice website on car insurance, so enough about
that...
So that leaves the subject of TVRs - or this one in particular. Remember I said in January that there seemed to be brake fluid down the front of
the servo but I assumed that it was just overspill from past work? Well I mustn't have believed it because I bought another master cylinder "just
in case" and I've been keeping an eye on it. Well, there's definitely rusty brake fluid coming out between the master cylinder and the servo.
Yesterday I loosened the two nuts holding the master cylinder on, and pulled it forward slightly to have a peek - yes the join is soaked in brake
fluid.
So today, we're going to fit the new one!
I start by lifting the car and removing the back wheels, so that I can check that the bleed nipples are free. Then i disconnect the bonnet strut
and lift it to vertical.
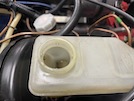 The next task is to use a wee vacuum pump to empty the reservoir so that I don't have brake fluid everywhere when I take the brake pipes off.
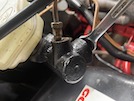 Then I put a cloth underneath and use an 11mm spanner to loosen the 3 brake pipes into the master cylinder. Then I use a 17mm socket on a long extension
to undo the two bolts holding the master cylinder to the servo. That lets me lift the master cylinder and reservoir off the servo, with 3 fingers
plugging the brake pipe holes to minimise spillage.
 Here's the servo - you can see the wee pool of brake fluid inside, that shows that the master cylinder seal is leaking, and the clear evidence of
where it has been leaking out.
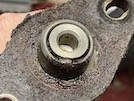 Here's the master cylinder complete with brake fluid and rust. It's not leaking badly, but it's leaking, so it's time for the bin!
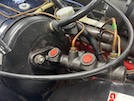 I bolt the new master cylinder in place, and reconnect the 3 brake pipes. There's a fourth brake pipe connection to the cylinder - I put a brake
bleed nipple in there.
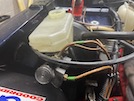 Then I remove the reservoir from the old master cylinder, and push that back into the top of the new one.
Then I fill the reservoir with new brake fluid and start bleeding all of the brakes, starting with the one furthest from the msster cylinder - the
left rear. Using the vacuum pump, it's pretty simple - put the pump on the nipple, loosen it, pump until you see new fluid coming through with no
bubbles, close nipple. Repeat for right rear, then left front and finally right front.
Then I lower the car off the jacks and have a test drive - seems to be sorted!
 Rear suspension, all cleaned up after the handbrake adjustment!
 Here's the refitted exhaust - you can see the 6 nuts and bolts at the top, clamping to the downpipes, and also the two joints to the main system.
 This is the brake master cylinder - it looks wet, but that's because it has been painted, it's not brake fluid!

 Fix it back on the door and for the first time that I can remember, I don't need that tie-wrap!


