:: Diary - March 2024 ::
:: Sunday, 3 March 2024 ::
It's TVR Car Club Day! And even more exciting than that (if such a concept is possible) is that we have agreed to take TVRs after the winter! OK,
it's technically spring but it doesn't feel like it, although BBC weather has promised all week that it's going to be dry today.
BBC weather don't half talk a load of pish. Not as much pish as fell from the sky over night, mind you, and starts again as I'm extracting the car
from the garage. I drive down to fill up with nice fresh fuel, and by this time it's bucketing down. My trust is in the BBC though, so I haven't
put the roof on yet. As I turn into the filling station, there's a TVR leaving - we wave, but he sets off up the road, while I am distracted enough
to stop on the wrong side of the pump.
The rain is off when I leave the garage though, and it stays off for the rest of the day! Good old Auntie Beeb!
Then it's off to meet up with Dave, Jim and Eric. Dave has 3 TVRs but none of them working - his Wedge is still under restopration from the flood
a year ago, and so is most of his house and garden so he has other priorities. His Griffith still has a conrod-size hole in the side of the engine
block and his S should have been ready but isn't - it needed two new front bottom balljoints, and there's a story - they are Fiat 124 / Lada parts,
but on those cars they fit onto a flat mount. On the TVR, they fit into a recess, and some pattern parts are too fat to fit in that recess - so the
safest thing to do is to buy from a reputable TVR parts supplier who guarantee to stock the correct parts, right? So the balljoints come and they
don't fit... he has spent days grinding and filing to get the bloody things on. See that "reputable TVR specialist" thing? Yes, quite.
So anyway, the long and short of it is that Dave has no TVR and needs a lift.
So off we go, me leading because I arrived at Dave's house last, so need to be first out the drive. The weather is clearing up but we don't have
time for a run - it's straight blast to Dunblane. It's absolutely feckin' brilliant though to be back in the car and enjoying a "fresh breeze".
We arrive at the venue and Jim gets out of his car and says "that was great after all these months"", so he's feeling the same as me.
And Hugh is here!
We have our usual over-large meal and usual over-exuberant banter, it's amazing how after 21 years with this wee car, it's stll exciting!
Only one wee problem - I felt that the brakes were a bit spongy, so maybe they need more bleeding after the master cylinder change. Or maybe jumping
out of a modern Land Rover into a wee sports car just feels different - I'll bleed them again anyway though, just to be sure.
All too soon, it's time to leave, after a wee chat in the car park.
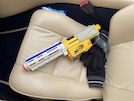 When I get in the car, I find that someone has left me a gift - a nerf gun. I'm not sure if there's a mafia-style message, and I don't have time to
ask because the other two have disappeared while I'm turning the car in the car park.
I catch them up after a couple of minutes and follow until they turn off.
 I do stop on the way home for a wee photo though, at a magic puddle. What's magic about it? Look closely at the photo!
So here we are, coming into our 22nd summer season together, and looking forward to the official season opener in Derbyshire at the start of April.
:: Monday, 4 March 2024 ::
First task today is to lift the car, take off the wheels and bleed the brakes again.
Then I decide to have a look at a wee problem yesterday. It seems to happen a lot on the 2.9 engine, and it means that if you're accelerating after
coasting (just as the engine comes off idle) there's a hesitancy - a stutter. I had this before and it turned out to be the idle speed control
valve, so I'm going to give that a clean.
First I disconnect the valve electrics, then remove two wee bolts from the front of the plenum to take the valve off. My old gasket splits in two,
so I'll need a new one...
With the valve off, I remove the two wee screws that hold the solenoid to the valve. They are very tight and need a gentle tap with an impact
driver.
Then I clean out the valve with carb cleaner, and screw it back together.
Now, I need a new gasket...
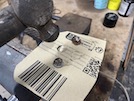 No problem! I remember my dad showing me how to do this many many years ago. You get a decent bit of cardboard (an Amazon envelope in this case) and
cut out a bit big enough to cover the face. Then you tap into the holes with a ball pein hammer - that cuts the card out like a stencil. Or a gasket.
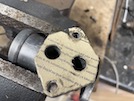 Start with the fixing holes - then you can put the bolts through to hold it in place while you tap out the rest, and then finally, tap around the
edge. One gasket!
I put that back together and reconnect the electrics.
Then I use a Pipercross cleaning kit to clean the air filter - first the cleaner and then rinse it out from the inside and leave overnight to dry
(or freeze solid, more likely...)
:: Wednesday, 20 March 2024 ::
You would think that at my age, you would know. But no, I still manage to be disappointed... and the conclusion of this unsurprising disappointment
is...
If you want something done, do it your bloody self!
Let me explain... Note that this is a Porsche story, not TVR, but the principle of "relying on a garage" is the same.
I think I said before that the Porsche had an MOT in September. The tester is a Porsche specialist (no, he really is) and he pointed out a collapsed
jacking point, front offside. It's not structural, he said, so not an MOT fail, but was bending the floor pan and needs to be fixed. He was hons=est
enough to say that he doesn't do welding so told me about another garage.
I heard a bad story about that garage thoough so decided to look somewhere else.
2 days later, the Porsche was on a display at the Porsche centre Edinburgh, to mark the 911's 60th birthday (not mine, the whole production run).
When I went to collect the car, I asked them for a quote for the jacking point. They took details and said that they would get back to me.
They never did.
So then I went to a bodyshop that does a lot of work on Ferraris, Porsches, Lambos etc. He said he would look at it, but his mind was clearly too
busy counting up the gross spondoolick they make from insurance work, and they would have difficulty fitting in a tricky shitey wee job on an old
glofied VW Beetle. They said they would get back to moe.
They never did.
Sod it, it's winter anyway so I'll worry about it in the spring. Well, that's now, and in the meantie Iwas told of another garage that aapparently
does good welding work on classic cars. So I took it in last Tuesday. They put it on a ramp and pointed at things and pressed things and blethered
away, then they took details and said that they would get back to me later that day.
That didn't happen either...
When I took the car back to the farm, I was moaning about this to Jock, who works there, and he said that I should just do it myself. Now I can
weld, but not well, so I don't want to do it. Also, my welder isn't working - the wire is jamming in the gun. So he said that if I get it ready,
he'll weld it up for me.
So that brings me back to the start of this entry, and I've spent the weekend cutting, grinding, hammering and wire brushing...
First I take the quickjacks along to the garage and lift the car onto axle stands, remove the wheels and the outer sill cover. Then I attack the
shutz underseal with a wood chisel and scraper.
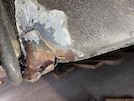 This is the jacking point in question. The sides are supposed to be straight.
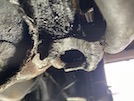 And from underneath. The bottom is supposed to be flat.
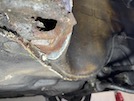 and there isn't supposed to be a holein the floor above it.
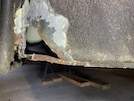 So it's out with the angle grinder and a wee hand saw, to cut out the rusty bts. The floor is double skinned at this point - what you see there
through the hole, is a heater pipe from the engine to the heater blower fan.
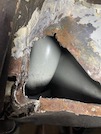 Another angle showing that heater pipe and the footwell behind it.
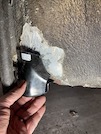 This is the new jacking point in place over the hole.
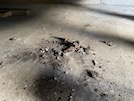 This is the old jacking point and the missing corner of floor.
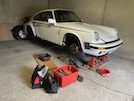 and this is the state of the rest of the car!
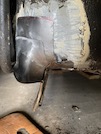 New floor corner fabricated prior to welding. A wee bit nore fine alignment required with a big hammer.
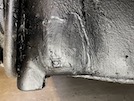 So last night, Jock welded it up. He also brushed on some seal sealer and gave it a spray of undercoat (which I didn't really want at this stage
but I ain't gonna complain...).
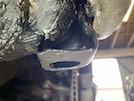 Here it is from underneath - a wee bit straighter tthan the old one was!.
 Then today I put the wheels back on and lower the car back onto the floor. Then it takes me longer to pack the jacks, stands, tools, bits of wood
etc into my car and bring them all home.
Now I'm going to wait for a dry-ish day to bring the Porsche back to the house so that I can clean up the repair, shultz it, then paint over that,
as per the original factory finish. Then once that's dry, I'll Lanoguard it again, as per the rest of the underside.
So that's it repaired and it's cost me next to nothing, but a few hours of O-level metalwork and a tin of Shultz.
In the middle of all that excitement, I've also sold the Chevrolet! The auction closed last night, I got less than I wanted but more than I really
expected, so that's fair enough. The buyer has paid a deposit and says he will pay the balance on Wednesday - he has to extract the funds from a
bank account / pension fund / his mother's mattress or something like that.
:: Tuesday, 26 March 2024 ::
Work has proceeded apace with the Porsche jacking point. Not a very rapid pace, but apace.
It has rained like the second coming of Noah, since the start of March. We had a half-decent day on Saturday though, so I brought the car along to
the house and put the TVR into the barn to make space in my garage.
Sunday was even nicer so I went off and did something much more pleasant.
So yesterday... I got the Porsche lifted onto axle stands and ready for more work.
First job was to remove the black waxoyl underseal, and anarea of the existing undrbody wax. Half a bottle of white spirit, a wee brush and some rags
took care of that...
Then I set up some grey overpaintable 3M stoneguard in a Shutz gun, and after some practice on a big bit of cardboard, set about spraing the repair
area. I think that I may have overdid it it just a bit because I struggled to get the same dimply finish as the original. I think that the fact that
the garage was cold, probably didn't help.
So with that left to dry overnight, I went back out today and sprayed the repair area in white. While it looks like the same shade of white as the
car, it's not the same shade of pale yellow as the inner wheelarch...
 But here it is, in all it's not-matching glory! You can see that the Shutz has sagged, due to being too thick (or being sprayed on by someone too
thick) but overall, it's not too bad.
Once the paint has dried, I'll give it a couple of coats of Lanoguard like the rest of the car. Once it has some road shit sticking to it, it'll be
fine!
The next job is to the outer sill cover, putting the 5 screws in loosely at this stage until i can replace the clamps for the oil pipes under the
floor. This tturns oout to be stupidly fiddly, because the bolts are only just long enough to reach, if you leaver the ends up and turn them at the
same time. There's another wee clip under the front wheelarch.
Then the side rubber trim slides into the sill cover, with a wee end cap on each end.
Right, time to replace the carpets that I pulled out in case they caught fire during welding. This appears to go well - first there's a footboard
that clips in, then a carpet pannel covering the inner wheelarch. Next is a wee panel that goes on the sde of th footwell from the door to the
wheelarch - it's held on with 3 screws - 2 into the door pillar (that are easy because you can see them) and then a third screw that goes through
the side panel into the footwell - and you can't see what you're doing, so you end up trying to fit a screw through two carpets into a hole that
you can't see. I try various permutations and it takes literally hours to get that last screw in...
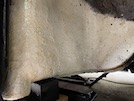 Then I give the jacking point and the front of the floor a spray with lanoguard, just to complete the protection. It looks not too bad (and not too
shite either....)
Now all I have to do is wait for a wee break in the weather so that I can swap the TVR back by the end of next week for our first TVR excursion of
the season!
I haven't done this to save money - I would have been happy to pay for a repair, but I couldn't find anyone to touch it. It's done, it's solid, and
it has cost me next to nothing, except time.
 When I get in the car, I find that someone has left me a gift - a nerf gun. I'm not sure if there's a mafia-style message, and I don't have time to
ask because the other two have disappeared while I'm turning the car in the car park.
 I do stop on the way home for a wee photo though, at a magic puddle. What's magic about it? Look closely at the photo!


