:: Diary - December 2012 ::
:: Wednesday, December 5, 2012 ::
Work has been really busy, and the weather has been bloody freezing, so I have had neither the time nor the inclination to start putting the car back
together. So it's still sitting on stands in the garage, surrounded by big bits and wee bits. I am sure I laid them out in some kind of order, but if I
did, it means nothing to me now.
It'll be fine!
:: Saturday, December 15, 2012 ::
Life is still pretty chaotic, mainly with work, because I seem to keep picking up jobs from new clients. Between that and various other stuff, I haven't
had a lot of time for car-fixing. It's also been freezing, so working indoors seems like the better option.
But today the temperature climbs to a tropical 6 degrees, so I put on the wooly underwear and try to make a bit of progress on re-assembly.
First - the diff. The new diff mount comes with two mounting bolts which I tried in the threads in the back of the diff, and decided that they are too
long - they will bottom out before they have clamped the mount to the backplate. Also, the supplied bolts have tiny ickle allen sockets in the back,
which might work for putting it together but will never be strong enough to take it apart again after 20 years of corrosion has worked its welding magic.
So I went out 2 weeks ago and bought two proper bolts about 5mm shorter, and I fix the mount to the back of the diff with those.
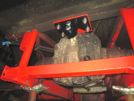 Then I jack the diff back up into position, and bolt the mounting plate to the chassis with new bolts and nylon nuts.
Then I take out the old diff plug and top up the diff oil until it just starts to run out, and I put in a nice new diff plug that doesn't have the allen
key socket chewed to buggery.
So far, so good!
Next job is to fit the petrol tank cradle. As I've said before (a month ago!) the holes for the body-mounting bolts (in the boot) aren't pre-drilled, so
I think it might be easier to drill them before I mount the tank on the cradle. So the plan (yes, there's a plan underneath this aimless fostering!) is
to stick some masking tape on the cradle, bolt the cradle on, and then mark the holes through the boot floor.
That turns out to be harder than I thought - the cradle is fairly light and it's very difficult to balance it on a jack while you fiddle the bolts in. I
do get there though, eventually, and mark up the masking tape.
When I take the cradle off again, though, the marks are a bit closer to the edge of that rear bracket than the old one was. I measure both, and compare
their shape - yes they are identical… All the mounting holes seem to be in the same place etc so I don't see why the boot holes line up slightly different.
I think I'll be safer to fit the cradle and tank, and then just drill the holes through from the boot.
So I set about strapping the tank back onto the cradle, using the measurements I took before I dismantled it all. The tank sits very slightly off-centre
(only by about 5mm or so) but it needs to be right or the filler neck won't go through the hole in the boot floor!.
I have several metres of flat rubber seal (that I bought to go round the garage door to keep the millipedes out) so I cut two bits to length and put them
on the cradle, and put the tank on top. Then I cut another two bits of rubber to the length of the holding straps, and fit those. The front one tucks
under the bracket on the cradle, and the rear one slips (when I say "slips" I mean "eventually lets itself be prised into place after you've broken half
your fingers") between the bracket and the back of the tank.
This is where I find a problem. The bolt holes in the rear brackets are about 10mm lower than they were on the old cradle - so the tank straps don't
quite reach. I have to drill two new 8mm holes just above the pre-drilled ones, then thump the straps into place with a rubber hammer (no wait, here's a
block of wood within reach), then check the tank mounting measurements again, a slight adjustment with the wooden hammer, and tighten it all up, using
big washers to clamp the rubber in place.
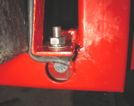 Here's one of the front bolts (I took this photo later when the frame was on the car, to show that if the strap bolt was upside-down you wouldn't get the
frame bolt in behind it.
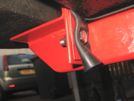 And here's one of the rear strap bolts, again showing how it clamps the rubber spacer.
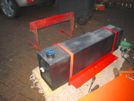 And here it is, ready for re-fitting to the car. Note the old rusty frame used for reference measurements!
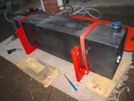 And from the other side.
I'm reasonably encouraged by progress today - ok it's not a lot but at least it's "putting together" rather than "taking rusty bits apart" and that's
always a bonus. I've had other stuff to do as well today though, so that's yer lot mateys!
In the next episode of Wheeler Dealers, Edd will be fitting the tank into the motah, and refitting all the pipes and stuff wot he does, while I do
something useful like go and negotiate 5p off a gallon of fuel to start the thing.
:: Sunday, December 16, 2012 ::
Right, let's get this tank into the car!
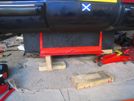 First, I prop the tank up on bits of wood, till I can get a jack underneath each mend, with more wood blocks as load spreaders. Then it's just a matter of
inching the jacks up, one side at a time, until the bolt holes in true frame line up with the ones in the chassis. All is going perfectly to plan, except
the bolt holes won't line up - the frame is about 3mm too far back and won't move forward.
The problem is that the tank is up against those two bolts that hold the diff to the mounting. Now I know why the new bolts were countersunk to sit flush,
eh?
So - I lower the tank and cradle back to the ground, and shift it out of the way, then I take the diff mounting bolts that came with the kit, and put some
nuts on them, clamp them in a vice and cut 10mm of the ends with a hacksaw, and clean up the end threads with a file, Taking the nuts off cleans the
threads up so that they will "catch" on the threads in the diff.
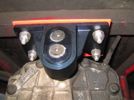 Then I swap the bolts, one at a time so that the diff doesn't move out of position from the mounting holes.
Right. Refit fuel tank, take two.
It's really not too difficult, this bit. Lift the back on each side by a couple of inches at a time, watch that the frame and the tank don't catch on any
sticky-out bits on the chassis or body. The main trick is getting the top lip of the tank past the bolt that holds the bottom end of the boot gas strut,
by making sure that you're tilting away from the bolt at that bit. Then almost immediately you have to tilt the other end of the tank up to get the filler
through the boot floor.
A bit of jiggery-pokery with jacks to get the top frame holes lots to line up, and I put in the bolts loosely. Then more jackery-pokery till the
bottom holes line up, and I put those bolts in, with new Nyloc nuts, and tighten everything up.
Now for the holes in the boot floor - pretty easy this bit, drill through the existing holes in the body, into the cradle, prise the body up a shade to
insert the rubber packing, and then bolt it together, bot forgetting the stainless steel trim that goes across the back.
Next - the fuel supply hose. I bought a lovely-looking stainless steel one, with fancy anodised ends and everything. I use a bit of plus-gas to lubricate
it to push it onto the stub underneath the tank, but it's not going on - it's not flexible enough to make the sharp bend around the swirl pot under the
tank and then push onto the stub. Then I notice that the outer sleeve has moved about 10 mm along the inner rubber hose so it's never going to seal. I
can't push it back and I can't cut it.
The other end goes on the pump though, but the clip won't tighten, it's too flimsy.
Sod this - I'll buy some proper reinforced rubber hose and use proper clips that tighten up.
The fuel return hose goes on ok though, and so do the electrical connectors on the fuel sender!
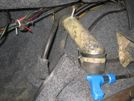 Last job for today is to fit the fuel filler pipe. It's a fiddly wee bastard, but it does go together. I don't have decent hose clips the right size
though, so I'll have to buy some and tighten everything up later.
So that leaves me with fitting those fuel filler clips, then sealing around between the tank filler and the body with squirty sealer, then buying and
fitting a fuel supply hose, and refitting the exhaust.
Then it'll be on to that trailing arm!
:: Wednesday, December 26, 2012 ::
Well Santa didn't bring me a fully-restored TVR S, or even a magic panto genie who could fix mine. So I'll have to get my turkey-stuffed carcass out and
under the car, and finish installing this fuel tank.
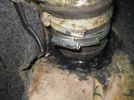 I went to the boat chandlers last week and bought some Sikaflex adhesive sealer, so today I peel back the carpets around the fuel filler, where it goes
through the boot floor, and loosen and lift the tank neck hose clip. Then I lay a good thick bead of filler between the rubber filler hose, and the car
body. I have to use my rubber-glove-encased finger to press the sealer in around the back of the filler, because the gun thingy won't fit. It's a tidier
job than the original!
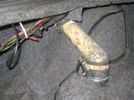 Then it's just a case of replacing and tightening the hose clip, then glueing the carpet back over the filler neck.
The next step is to fit the fuel supply hose. After the fiasco of the stainless braided hose, I found a place locally that sells hoses of every conceivable
description. It took me an hour and a half to buy one metre - 5 minutes to cut and pay for the hose, and the rest of the time to talk to the owner about
putting the world to rights. Birching hooligans, castrating rapists, speed cameras, van-driving natters, bus drivers - the range of conversation topics
was never-ending. I though I was a grumpy bastard but jees…
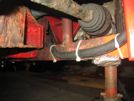 Anyway - hose routed as per the original, and fitted and tightened at both ends, and then fixed to the chassis legs using the original carefully-engineered
solution of 3 cable ties. Quick check over and that's it - all finished!
I fill the tank with exactly 5 litres of fuel, and check all hose connections for leaks. All ok.
Then I switch on the ignition and check the position of the fuel gauge - just between 1/4 and the red "empty" - so now I know when I have one gallon left.
Then I check the fuel lines again now that they are pressurised - the fuel filter banjos are weeping slightly. I tighten them up and then dry them, and
then start the engine (bearing in mind that I still have to refit the exhausts!). The front fuel connection (from the pump) is leaking again.
There then ensues a trial and error loosening and tightening of that joint, but I just can't get it to seal properly. It's only weeping very slightly, you
have to wait for ages to see the leak, but it's not right.
I need to take the joint apart and fit a pair of replacement copper washers, but not today.
:: Friday, December 28, 2012 ::
Went out to have another look at the fuel filter connector. I honestly can't get it any tighter - but it's still leaking slightly.
I notice when I dry it, though, that as well as the "bleeding" from the copper washer on the banjo union, the pipe also seems to be wet further down.
Dry it again and then poke with a finger - there is a tiny crack in the plastic pipe from the pump to the filter. Bugger, I don't have a bit of
replacement pipe. I stick some goo on it just to stop it leaking. It's too late to go to the shops for hose.
:: Saturday, December 29, 2012 ::
I buy a metre of braided fuel pipe (better than the plastic crimped pipe that's on it) and a couple of mini hose clips.
When I get home I remove the banjo joint on the filter, and then slice through the pipe at the pump end. With the pipe off the car, I slice through the
other end and free the banjo, and clean the faces of the banjo with wire wool.
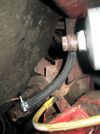 Then I cut a bit of new hose to length, fit it to the banjo and then to the filter, and then reassemble the banjo joint with new washers. After a bit
of tweaking and tightening, it seems to be leak-free, even with the engine running.
It's at this point that I remember that I meant to anneal the washers first (by heating them to cherry red and then quenching them in water) to make
them softer and more ductile. I'll check the joint again for leaks with the engine running, when I've got the exhaust on (I don't want to run the car
for too long with no exhausts!) and see if that's necessary.
:: Sunday, December 30, 2012 ::
God, this job has dragged on for ages - mainly due to my 4-week sabbatical in the middle, and partly due to the fact that I don't normally get round to
starting till 1pm and it's dark here by 3.30 (yes I know I am in a lit garage, but that's not the point ok?).
Anyway, today I get the exhaust refitted (no problems with that, I've had plenty of practice). And that's it!
I start the car up and check all the fuel connections for leaks - all seem to be ok. Then I check that the exhaust isn't leaking.
While I am sitting on my wee seat, basking in the self-satisfied glow of someone who has completed a job in 5 times the number of hours that anybody
half-motivated would take, I look around the garage. It looks like a van load of rust has crashed into a Machine Mart tool display. I've said before that
I am not the tidiest of workers, but this time it really looks bad.
At this point my CDO kicks in (it's like OCD but with the letters in the right alphabetical order, as they should be) and I decide to tidy up this shitheap.
Countless spanners, 8 (yes eight) screwdrivers, 2 chisels, 3 pliers, mole grips, pump wrench, 3 hammers (a big one, a wee one and a rubber one), a
scraper, a stanley knife, two ratchet handles, various sockets, 2 different lengths of socket extensions, a universal joint, a wire brush, an electric
drill, an angle grinder, two electrical extension lead, a crowbar and various paints and brushes later, and I can walk about without tripping.
Then I pick up various brand new nuts, bolts and washers, and then put various used, but not badly damaged ones, into a different box, before I sweep the
rest of the rusty bolts, hole clips and rust flakes of old tank frame into the bin.
Only the wheels to put on now - but somebody comes to the door and by the time I've dealt with that, I can't be bothered going back out to the garage.
It's pishing rain anyway so there's no rush to get it outside anyway.
Next job is the nearside trailing arm, but I think I'll leave that until after the Car Club meeting in January, in case, by some miracle, I decide to turn
up in a TVR.
That reminds me - the Cerbera isn't sold yet, the potential buyer pulled out so it's still there. The dealer has repainted the front end and sorted various
other cosmetics - I might buy it myself! I don't think it's going to be sold now until after the worst of the winter - March or even April at the earliest
now, I think.
:: Monday, December 31, 2012 ::
Robert Burns wrote the lines
"The best-laid schemes o' mice and men
gang aft agley,
and leave us nought but grief an' pain
for promised joy."
He wrote those words in 1785, after his horse plough turned over a wee mouse's nest in a field. He was such a visionary, though, that he knew that every
TVR owner, even owners of cars not conceived until 215 years later, would all feel the same as that wee mouse at some point (well, many points) in their
ownership.
You'll have guessed, no doubt, that today didn't go well.
Let's start at the beginning. No, not the day my TVR first kangaroo-hopped put of Blackpool, I mean today - I eventually got out to the car and got the
wheels back on and then got the car lowered back onto the ground.
It started first time, as it always has. I decide to go and stick some fuel in, so that I can have a wee New Years Day drive (the petrol stations will
be shut though).
I reverse out of the garage onto the drive, and leave it running while I shut the garage doors.
I jump back into the car and reverse out of the drive onto the road.
The car splutters and stops.
It won't restart. It turns over, but no go.
"Bugger," thinks I, "it's not got enough petrol in it when it's pointing downhill."
So I push it up onto the pavement outside the house, and get in the other car to go for another can of petrol.
This takes longer than expected since the normal holiday siege mentality has taken over and everybody is filling up with petrol because the garages are
shut tomorrow and they don't want to run out - even although 90% of them will be in no fit state to drive tomorrow anyway.
Anyway, I get home and stick another 5 litres in the tank.
It still won't start.
Right Wurzel get yer diagnostic head on.
Well first, I can't hear the pump priming when I turn on the ignition.
I disconnect the main fuel supply to the fuel rail and put the end of the hose in a bottle. Turn the engine over - no fuel.
So - no noise and no fuel means fuel pump not working.
I don't really want to start working on it at the side of the road, so I start pushing it back into the drive, but I can't push it up the wee hill at
the end. I stick it in reverse, and slip the clutch to move it back on the starter. With a bit of manoeuvring, and some ancillary pushing from Douglas
next door, I get it into the garage.
I am amazed how much power is in the battery! It's got more kick than a Jackie Chan chop-socky trilogy, very impressive. I put a trickle charger on it
though to make sure it's ready for when (or if) I get the pump fixed.
Right, more diagnostics, after I get the nearside jacked up, and the rear wheel off so that I can reach the pump.
I pull the loom connector apart to check for voltage, but there's nothing. Then the connector falls apart, and one of the wires falls out. Aah! I merrily
go about chopping off the connector and crimping in new bullet connectors, confident that I have found the problem.
All rewired, reconnect everything, turn on ignition and… nothing.
More extensive diagnosis required, but not today. I need to make the dinner! Priorities, see?
 Then I jack the diff back up into position, and bolt the mounting plate to the chassis with new bolts and nylon nuts.
 Here's one of the front bolts (I took this photo later when the frame was on the car, to show that if the strap bolt was upside-down you wouldn't get the
frame bolt in behind it.
 And here's one of the rear strap bolts, again showing how it clamps the rubber spacer.
 And here it is, ready for re-fitting to the car. Note the old rusty frame used for reference measurements!


