:: Diary - January 2013 ::
:: Tuesday, January 1, 2013 ::
Seeing as the plan for a New Year blatt has been put on hold, I decided to add half a bottle of whisky last night to my celebrations. Jura single malt it
was. Very nice.
Anyway… on with the fuel pump diagnostics. First test the the battery voltage (essential to any electrical diagnosis, although there are some who bypass
this step and only find out their battery is flat after the car is in bits and they have exhausted all other possibilities). It reads 12.5V.
Now to the pump wiring. I disconnect the pump and connect the voltmeter across the ends. Turn on ignition. Nothing. Okay… run a jump lead back to the
battery earth, and use that to test the supply. Still nothing.
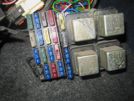 Next step - check fuses. I pull down the panel under the glove box and extract the mass of wiring and bits. The fuel pump fuse is that clear 25A one
beside the 4 silver relays. I have to use pliers to get it out, and it falls to bits in the process because it's part-melted as well as blown. I even have
to extract one of the terminals separately with needle pliers. New fuse replaced and on to the relays.
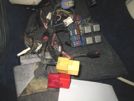 Those 4 silver relays control main/dip beam, front fog lights, engine cooling fan and the boot lock. The fuel pump relay must be one of the other two
separate ones (yellow and red). When I remove the yellow one, the contacts are a bit dirty and corroded. I clean up the contacts and test the pump
wiring again.
Now I get 12V for a couple of seconds, then it drops to 1V or so. That corresponds with the normal "pump priming" noise you get when you turn the
ignition on. There is an "engine running" signal from the ecu so that the pump only then runs after the engine starts. So it all seems to be working properly.
One more test though. I run a couple of test leads straight from battery to the pump, to bypass all the car's circuits etc. The pump clicks but doesn't
turn. It's official. It's fecked.
Pump test part 2. I clout it with a hammer to see if that maybe stuns to back to life. Nope, still fecked.
So it's time to remove the pump. First I spray some rust release agent on the pump clamp bolts.
Then I clamp the main feed hose from tank, to prevent the tank emptying when I disconnect the pump. Then I remove the hose from the pump end, and use a
tin to catch the resulting slight fuel spillage.
Then I disconnect my new hose connection at the front of the pump, and again catch the resulting fuel spillage.
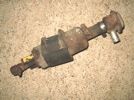 Then I remove the clamp bolts, which is fiddly because they are not captive nuts and they are awkward to get to. And rusted tight. Once the pump is off,
I clean it a bit then test it again on the bench, from a spare 12v supply. Still fecked.
So I need a new pump. A bit of research shows that the original was Lucas part no FDB 702, equivalent to Bosch 580254911. Bosch also do a 580254910 (one
digit different!) which is the same size, but slightly higher capacity and pressure.
These pumps were fitted to a huge selection of cars including various Mercedes Benzes, VW/Audis, the Ford Capri 2.8, and loads of other stuff. The
original-spec ones are about £120, and the higher spec ones are about £108 (more common, apparently, so cheaper). There's also an equivalent Sytec available
at £65, with the same spec and same fuel connection fittings. I've never heard of them, but they are the brand that Demon Tweeks sell, and appear to be
popular among drivers of mental Subarus and classic Fords. So I'll get one ordered (not from DT though, they don't do the right part no, and are more
expensive anyway).
All good fun, eh?
:: Wednesday, January 2, 2013 ::
First things first - I fire up the laptop and do some final checks on pump specs and prices, then order the one I saw yesterday. I also order a new banjo
connector in case mine is knacked and won't come off.
Then it's out to the garage to dig out some new clamping bolts, nuts and washers. I have to cut the bolts (the only M8 bolts I have are far too long) but
I end up spending an hour tidying up the top of the workbench so that I have space to use the hacksaw. I really am a cluttery bastard.
I also spend ages looking for thread lock or something similar, to use on the banjo threads. I'm sure I have some, but I can't find it. Item 1 on the
shopping list.
While I am doing that, I get an email - the pump has been despatched today, so provided that Postman Pat gets the finger out, it should be here before
the weekend, so that I can get the car back together for the car club meeting on Sunday.
The garage is really damp - the weather has been persistently wet for weeks, and I noticed the other day that the wheels I had propped against the wall,
have corroded really badly. So have the ones on the car, but not as badly.
I think I need to think about a wee garage heater for these winter months.
I think I also need to think about getting the wheels refurbed and powder coated, so that I don't have to polish them every time I use it. There's a place
near here that does them - you drive in, they take the wheels off, remove the tyres, refurb, powder coat and finish, then replace the tyres and balance.
All you have to do is pay and drive out. I think I might ask about a cost.
:: Thursday, January 3, 2013 ::
Postman Pat has had too many e-numbers I think, and arrived today all hyperactive, with a fuel pump in a parcel. Not bad - next day delivery at this time
of year.
As I am heading out to the garage, I end up chatting to my neighbour, and that ends up with me sitting in their house for a couple of hours, drinking
beer. By the time I leave, I'm feeling a it woozy - and it's only 3pm…
Right, back to the garage. It's over there somewhere, across this wobbly bit of driveway.
The new pump is slightly bigger diameter (about 5mm) so I wrap on a thin rubber sleeve (to cut down vibration) and refit
the clamp. Then I assemble the new banjo joint on to the pump, then swap over the pre-filter and wee bit of pipe. Finally I make up two short lengths of
wire to connect the pump to the car's loom (at that connector I had to cut off).
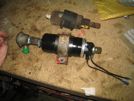 Here's the new pump alongside the old one. This photo suggest there is a huge difference in size, but that must be the perspective - it's slightly bigger
diameter, and about the same length, end-to-end (although the casing of the new pump is longer, the output connector is shorter).
I haven't changed into my "already-covered-in-car-shit" clothes, so I'm not going to fit the pump at the moment. 'sides, I am expecting visitors so I need
to get the dinner on!
:: Friday, January 4, 2013 ::
The new pump is in and working!.
Fitting the pump itself wasn't too hard - I had assembled all the bits so I only had 3 steps (or so I though…). First I connect up the wiring and try it,
to make sure everything else works. It does!
Step 1 - clamp pump to chassis. This sound sound easy, but getting the nut onto the bottom clamp bolt is fiddlier than a roomful of MPs doing their
expenses while Ken Dodd does his tax return in the corner. You just can't reach the end of the bolt, between the chassis and the front of the trailing
arm past the brake pipe and handbrake cable. I do eventually manage to get the nut on. The top one is easy, then tighten them both up.
Then I nip underneath the car and connect up the fuel supply hose and tighten the clip, then remove the clamp on the supply hose.
Then I reconnect the wee hose from the pump to the filter, and tighten up the banjo.
Finally, I reconnect the wiring and switch on the ignition. Pump primes and stops, and I check for leaks. Seems ok. When I start the engine though, one
of the filter joints is leaking. I try to tighten in but it's just not for sealing. When I look more closely, it looks like the filter case has cracked
slightly.
Bugger, bugger, bugger - I depressurise the system (by removing the pump relay while the engine is still running, and just letting it run out of fuel)
and take the new filter off, and transfer all the pipes etc back to the old filter. This time, I anneal the copper washers first by heating them to cherry
red and dunking them in water, and I also wrap the banjo threads in ptfe tape. I refit the filter, refit the connections and everything seems to be sealed!
:: Sunday, January 6, 2013 ::
It’s TVR Car Club day! And it’s not raining! I extract the car from the garage and set off for Dave’s. The car takes a couple of miles to warm up, but
within 5 minutes, here I am thinking “This is brilliant, this!”
And it is. It’s a raw driving experience, in complete contrast to the Lexus, and even to the Cerbera. You can feel what it’s doing, where it’s going,
you can feel that engine and hear that noise, and all at reasonably sensible road speeds.
After a stop for fuel (to run out of petrol once at a club meeting is unfortunate, to do it twice would just be fucking stupid) I arrive at Dave’s, with Jim.
There’s only 3 of us in 2 cars today, so we set off on our wee run. After we leave the motorway, I decide to a play a game of “how fast can you go, and
for how far, along a reasonably twisty road, without touching the brake pedal” – I manage about 7 miles, braking only once (to turn right at a junction,
so that doesn’t count in the rules I just made up) before we catch up to a wee red Fiat Punto, whose driver appears to have to brake at every bend, or
every time somebody comes the other way, or entirely at random sometimes. We catch up to him just before the twistiest bit, so we have to follow for 2
or 3 miles at 40-ish miles per hour, with the brake lights flashing on and off continuously.
There are a lot of cars at the meeting, certainly for January, although only two have travelled roofless. Chimaera drivers only take the roof off when
it’s been continuously sunny for a fortnight, rain makes their medallions go green.
As usual the service is slow and the chat is excellent. Adrian has already started making plans to have his car ready for Chatsworth 2015, we also discuss
S Club 2013, and “Back Home” in Blackpool. James, the new boy, has come along in his early Chimaera, and makes the mistake of sitting at our table and
panicking in case we all start on him instead of each other.
All too soon. It’s time to head home again, past the scene of my fuel-less disgrace in November. I drop Dave off and get home in the dark.
What a great day, they don’t happen very often, but occasionally everything just comes together, and it doesn’t get any better.
:: Wednesday, January 15, 2013 ::
I haven't had a lot to update for the last week or so. The two possible next jobs are either:
1. strip the rear suspension and take the nearside trailing arm off so that I can rub it down and repaint it. I don't think it's damaged, just all the
Hammerite is falling off. Before I can start that, though, I need to borrow a big socket to get the hub nut off the driveshaft.
2. Strip and repaint the front of the chassis. This time I'm going to take the bonnet off so that I can get better access, and also fit the stainless hinges.
I phone Dave and arrange (scrounge) a loan of his big socket set.
I'll need to nip along to the farm and bring back the spare wheel (you have to fit that to get the nut off - I'll explain later!)
I've mentioned before about the garage being damp inside, especially one back corner. That whole wall is always infested with bleeding millipedes, and
I haven't been able to figure out where the damp is coming from. Got a roofer out today and they fixed it. Last straw was the corrosion on the wheels
the other week.
Well I was moaning to my neighbour a couple of days later, and he said that I've got a couple of broken tiles in that back corner - the one bit of the
roof I can't see from my own garden. I go through into his garden, and right enough. It's been like that for years, he says - before I bought the house…
"Well you might have told me!" He didn't realise that I didn't know.
Anyway, I got a roofer out today, and he replaced the broken ridge tiles, so with any luck, no more damp.
I've had a dehumidifier going full tilt in there since I parked the car up last Sunday. It drew up a huge amount of water in the first couple of days,
but the stuff in the back of the garage definitely doesn't feel as damp. With the roof fixed, hopefully it will stay that way.
Then I go in to a shopping centre in Edinburgh, and go to a cash machine. Dave's daughter works in the shop next door, and she's at the cash machine
right in front of me, so I start pretending that I'm trying to see her PIN etc, just for a laugh, as you do. I even say "I'm not looking at your number,
honest."
She turns round.
It's not her. It's a completely random stranger who looks like her from the back. She looks a bit like her from the front as well, to be fair. But it's not
her.
Shit.
Her husband was staying further away and was watching me, so he wants to know what's going on.
Double shit
I point at Dave's daughter through the window of the shop next door and say "I thought you were her, see you look the same… look…"
Well I didn't get arrested or kicked in, so they must have believed me.
:: Friday, January 18, 2013 ::
Well, still no sign of a kicking, or any police at the door, so my cash line cock-up has obviously been forgotten.
I've got the lurgi that's going about though - I've not felt great all week, but today has been hellish. Of course, today is the one day that I have to
go out trailing all over the place for work meetings, so that doesn't help either.
When I get home, I go out to throw stuff in the bin, and there's a cloth lying outside the garage, wrapped in the cloth is a 41mm socket - santa Dave
has been!
Unfortunately I spend the rest of the weekend shivering in the house, within "penguin two-step" distance of a loo. The strain of turning that hub not
would lead to severe internal damage for me and an environmental catastrophe for my neighbours.
:: Saturday, January 26, 2013 ::
After another week of running about like a daft thing (I really didn't plan for my business to get this busy) I am going to have a go at that hub nut.
As I walk out to the garage, though, I remember that I haven't been to the farm for the spare wheel yet, so the recommended removal method isn't available.
What you are supposed to do is take the wheel off and put the spare wheel on, and THEN loosen the hub nut. The 41mm socket doesn't fit through the hole in
the centre of the standard 8-spokes, but the spare has a bigger centre that the socket fits through.
I could go and get the spare wheel, but it's really icy, and I am also too bloody lazy.
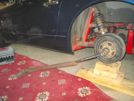 I jack the car up and take the wheel off. Then I lower the brake drum onto a pile of wood blocks, so that the trailing arm is supported in roughly its
normal loaded position. Handbrake on tight, car in gear, chock the other 3 wheels. This hub has a left hand thread so it has to be turned clockwise to
loosen. I put a breaker bar on the socket and then a bit of tube (the corner I cut off when I repaired the chassis 2 years ago) and off she comes!
I only turn the nut half a turn, and leave it in place for now.
Right, next step is to remove the brakes. I remember to let the handbrake off, and put the car in neutral. You don't want to be trying to hammer off a
brake drum while the handbrake's on, do you? The drum won't move though - it hasn't been off for years, and no matter how much I clout it, it's stuck
firmly on the hub. So it's out with the wire brush, and get most of the crud. Then the blow lamp, and a bit of heat around the join. Then some plus gas
and a few more c;outs around the centre to dislodge it - and off it comes.
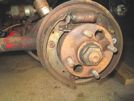 The next step is obviously to remove the brake shoes, and all the wee fiddly bits and springs that hold them in place, disengage from the handbrake cable
and put away carefully.
The brake pipe won't come out of the cylinder, so I snip it off and fold over the end to stop all the brake fluid leaking out. I'll make up a new pipe
later - the big advantage of having your own brake pipe flaring kit! I can't get the flexipipe to loosen at either end - I've got a new one anyway so I
just cut through it and stop up the end.
Then I remove the handbrake cable from the backplate. This is another fiddly job, there's a metal circlip holding it in place, then once you get that off,
it's still rusted in, so it takes a lot of twisting and pushing apart with chisels - but it comes off! There's also a clamp holding the cable to the top
of the trailing arm about half-way along.
Right - next step is to remove the hub nut, out far enough to protect the end of the exposed thread, and then thump it with a wooden mallet (or a metal
mallet against a bit of wood!) to disengage the hub splines. Then remove the nut completely.
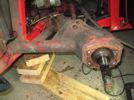 Then with a 17mm socket through the holes in the hub flange, I undo the 4 bolts holding the hub to the trailing arm, and remove the hub complete, and
put it away wrapped in a cloth to keep stray shit out. The backplate also comes off at this stage.
God, I'm knackered!
Next step is to loosen the bolt through the outside bush. I spend ages with wire brushes and blunt chisels knocking all the paint off so that the
spanners will get a good grip, because it's bleeding tight! If I round it once, I'm stuffed.
I get a ring spanner that's older than me (honest - I think my dad brought it back from WW2, seriously!) because it's the best spanner I've got. Apply
plus gas, wedge the spanner on the nut, get underneath, get my foot on it, and it turns! Once I've got a few turns on it, I knock it through the bush a
wee bit, and get the air ratchet on the bolt head - that spins it out in no time. I leave the bolt in for now.
Then I remove the shock / spring. Again, the air gun takes no time at all.
Last bit - the 4 bolts holding the inner end on to the inner bush. They have 14mm heads which are covered in paint. I clean them up with the needle
descaler (more about that in a minute) until I can hammer a 14mm socket on, and take them out one at a time.
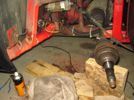 Then it's just a matter of supporting the arm on the bits of wood, and knocking out the bolt through the outer bush, before twisting the arm off the
end of the driveshaft.
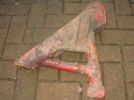
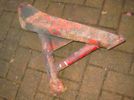
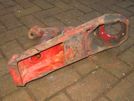
Here's the arm off the car. There isn't much paint left on it, but it doesn't seem to be damaged.
Back to the needle descaler. It takes me maybe 20 minutes to completely remove all of the paint and rust. It's brilliant. One advantage is that you
know that any bits that survive a needle descaler, aren't already weakened by rust. The other advantage is that instead of chucking loose flakes everywhere
like a wire brush does, it just drop them where you're working. The pile of rust and paint is no more than 2 feet across.
The big disadvantage is that it's noisy. God is it noisy. And it uses a lot of air, so between the descaler itself, and the compressor going full tilt
trying to keep up, it's ear-bleedingly deafening.
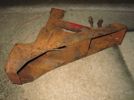
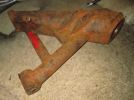
But here's the difference it makes - one bare trailing arm (well almost, there's one area of paint that's stuck like wossname to a blanket, but if it's
stuck on that well, it can stay). A few wee bits just to tidy up, but it's getting dark and starting to rain, and I can't really see what I'm doing.
Inside the garage though, I remove the wheel cylinder from the backplate, and then with better access, I loosen the brake pipe connection and the bleed
nipple. There's no sign of the cylinder leaking, so no point replacing it.
I also check the brackets on the chassis to make sure they are not bent or corroded, but they are fine.
So, I have to: finish descaling the arm, strip the chassis brackets, and then paint all that with POR15; strip and paint the brake backplate; and clean
up all the brake parts ready for reassembly. I think I might buy a new bolt for the outer bush as well.
:: Monday, January 28, 2013 ::
I decided to give my neighbours a day off yesterday, it being the sabbath and all. There was also the minor consideration that I couldn't be arsed.
But today, with arse firmly in gear, let's get on with this!
First I need to get the remains of the brake hose off. The connector to the car metal brake pipe comes off, so at least I don't end up having to chase
myself halfway along the brake system till I find a connector that still works.
The brake hose connector itself is rusted solid - and you can't get a good turn on it with a spanner, because the bracket is made of tinfoil and bends as
soon as you look at it. So I resort to a dremel thingy and about 5 mini-cutting disks, and a bit of plywood to protect the fuel hose that goes right past
the bracket, and I get the damn thing off eventually, without damaging the bracket.
The connector on the trailing arm is a bit easier to cut through, off the car with a proper angle grinder.
Then I degrease the trailing arm around where the hub bearing sits (it gets all greasy!) and then fire up the percussion section again, and strip the
rest of the trailing arm, and also the brake backplate.
I also use the descaler on the chassis brackets and on the wee inner stub of the trailing arm. The brackets are already POR15-ed from when I did the
chassis repair, and I'll tell you what - even with a needle descaler, that stuff does not come off easily!
Then I spray both bits with Metal Ready (part of the POR15 system) and leave them to soak for 20 minutes or so, before hosing them off and drying them
as best I can with a towel, before I leave them in front of the dehumidifier to try to draw most of the water out.
Finally for today, I clean all the brake shoes and other bits with brake cleaner.
Next step - POR15 painting!
:: Tuesday, January 29, 2013 ::
Not a lot to report today. First I dig out 4 old M10 bolts, and screw them into the threads at the hub end of the trailing arm, so that I don't get paint
in the threads (POR15 is an absolute bastard to clean out of threads, once it has cured). I leave them sticking out a bit though, so that I can balance
the trailing arm on the bolt heads once it's painted, if I have to.
Then I paint one coat of POR15 onto the trailing arm. It takes ages - it doesn't half have a lot of nooks and crannies! The biggest of those is the main
big box section from the inner bush to the hub - how do you paint away down inside that? The answer seems to be the load as much paint as possible onto
the foam brush, and waggle it down inside and then have a poke with a torch to see if you missed a bit. Repeat till the inside of the section, and you,
are covered in paint.
That's all I have time for today, though - I'm just too busy!
:: Thursday, January 31, 2013 ::
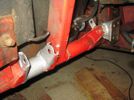 I go back out to give the trailing arm a second coat, but as I am opening the paint tin, I realise that I forgot to paint the brackets on the chassis -
so I start with that.
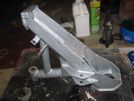 Then I recoat the trailing arm, again making sure I get paint down into that box section..
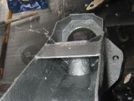 Here's the view down inside that box section - it looks pretty well covered. I intend to spray waxoyl down there, and into both the round tubes of the
A-frame, after I've painted the bits I can reach.
Then I hang up the brake backplate on a bit of wire, and spray that with satin Hammerite.
Not much more I can do now, until that's all dried.
 Next step - check fuses. I pull down the panel under the glove box and extract the mass of wiring and bits. The fuel pump fuse is that clear 25A one
beside the 4 silver relays. I have to use pliers to get it out, and it falls to bits in the process because it's part-melted as well as blown. I even have
to extract one of the terminals separately with needle pliers. New fuse replaced and on to the relays.
 Those 4 silver relays control main/dip beam, front fog lights, engine cooling fan and the boot lock. The fuel pump relay must be one of the other two
separate ones (yellow and red). When I remove the yellow one, the contacts are a bit dirty and corroded. I clean up the contacts and test the pump
wiring again.
 Then I remove the clamp bolts, which is fiddly because they are not captive nuts and they are awkward to get to. And rusted tight. Once the pump is off,
I clean it a bit then test it again on the bench, from a spare 12v supply. Still fecked.


