:: Diary - May 2022 ::
:: Sunday, 1 May, 2022 ::
It's TVR car club day, and here's me with a TVR along at the farm and only a Porsche in the garage here. Oh well, we've been persona
non gratis many times before, and the Porsche has a heater, so that's it decided!
Today is also the debut of Jim's freshly-resprayed and freshly MOT'd 390S. We meet up for a wee drive through. Dave isn't going
because he's away on a wee romantic weekend with his wife, to make up for missing the wedding of the year at the start of the month.
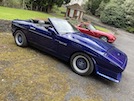 Jim's car looks bloody good - it's BMW San Marino Blue, and I think it really suits the car.
We have our usual discussion about not very much of any relevance, around a very nice dinner including an individual steak pie that
looks like it could feed a whole family, and nearly leaves no room for dessert. Nearly.
Then it's home time, following Jim by a different route.
During all this driving, I'm thinking to my self that the extra power of the Porsche makes keeping up a whole lot easier, without
having to wind through the gears quite so much. Jim has often said the same about his V8S... Hmmm...
When I get home, there's a guy from Glasgow on the TVR Faceache group, whose thinking of selling his V8S. It's white and it looks
very nice. Wonder how much he wants? But then I think again - I've had mine 19 years and I'm still ironing out problems, and I'm
not ready to inherit somebody else's. So no.
Then I see another post about somebody who has fitted power steering to his S using an electric pump and a Subaru rack. It looks
really tidy. Now that might be an option... I feel a winter project coming on!
:: Monday, 10 May, 2022 ::
About that winter project - well it has really taken hold - in my head at least.
There are two options:
1. Electric power steering column. Some owners have done this using a Vauxhall Corsa C steering column, which has a built-in electric
motor to help you turn the steering. The advantages, as far as I can see from a wee bit of research, are that it's speed adjustable
so you can have full assistance when parking ect, but no assistance at speed; and that it lets you retain the existing rack. The
disadvantage is that you have to cut both steering columns and weld the Vauxhall bit to the TVR (or rather, Ford) bit. That's not
necessarily a deterrent though - but what is a deterrent is that you have to rip the dash out to make up the necessary brackets etc
to support the new column and electric motor.
Option 2 is to keep the steering column but install a full hydraulic rack, and an electric pump. It seems that a Subaru Impreza
rack of a certain vintage fits the mounts etc, although the track rod ends might be different (different tapers into the hubs) and
the steering pinion is too long and fouls on the TVR chassis, so needs some delicate adjustment with an angle grinder. You also need
to turn the pinion round 180 degrees so that the pipe fittings all clear the chassis.
Then you need an electric pump - Citroen Saxo or Vauxhall Astra Mk5 appear to be the pumps of choice for the boys and girls modifying
their Chimaeras and Griffiths.
There's no info at all about fitting the same system to an S. Since the S and the Chimaera use the same manual rack, though, there's no
obvious reason why the same system wouldn't fit. It's not the obvious reasons that you have to worry about though, is it? No, it's the
gazillion small differences that turn something pretty difficult into something even more difficulter.
But... fools rush in where angels fear to tread, so let's give it a go over the winter. If it works, I'll be able to do a full "how to"
write-up for here. If it doesn't, at least we'll all get a laugh at how easy it is to waste money when you don't think things through.
So, without further ado, I start looking through the 'bay for suitable major components.
First, the rack. I find a few reasonable-looking Impreza racks (tip - if the wife walks in while you're doing this and asks you what
you're doing, don't say "I'm just looking at photos of this impressive rack")... Eventually I settle on a 1998 Impreza STi PAS rack.
Next, pumps. Vauxhall Astra pumps are easier to find (and cheaper) than Citroen Saxo ones. They also apparently give a slightly higher
pump pressure. (tip - if the wife walks in while you're doing this and asks you what you're doing, don't say "I'm just looking for a
good pump")... The correct pump is an Astra Mk5 TRX pump - find one complete with hoses, brackets and wiring and add that to the basket.
Finally, for now, a new bottom balljoint for the steering shaft. The Subaru pinion is too long, so you have to shorten it so that it
clears the chassis. That also cuts off the splines... So then the advice is to grind and file a hex onto the shaft, that takes a Ford
Fiesta balljoint. I find a genuine Ford part (not one of the cheap plasticene copies) and order that too...
So, boys and girls, that's me a little over £250 in, including postage, but having ordered all of the main components.
I'll still need mounting clamps and rubbers, a new steering shaft, hydraulic hoses, a couple of wee adaptor plates, a couple of wee
spacers, wiring and relays etc, and I'll need to make or adapt a pump mounting bracket. I might also need new track rod ends (depending
what's already on the rack) and bump stop spacers to go inside the rack. And probably gaiters by the time that I've pulled the rack
apart to check it and add bump stop spacers etc.
I mean, how hard can it be?
:: Wednesday, 11 May, 2022 ::
It's like Christmas! Two deliveries today - the rack and pump.
First I check the rack - 2.5 turns lock-to-lock, no noticeable play in the track rod balljoints or in the track rod ends. One of the
gaiters is split but the innards look clean enough.
I can't check the pump without wiring it up, but it looks good, nice and clean inside.
 After a bit of a clean up, they look not too bad!
Subaru racks have two different sizes of mounts - 25mm and 30mm wide, mine are 30mm, so now I can order new mounting bushes and brackets.
I also need 20mm spacers on the mounting bolts (all will be explained!) so I order those too.
Then I also order new gaiters.
That's me now £380 in, with really ony a steering shaft (rack to column) and hydraulic hoses still to buy. I'll need to get everything
fitted in place before I can measure and order those though.
So - by this winter I'll either have fitted power steering for a total of just over £400, OR I’ll have bought loads of useless shite
that will never work. Time will tell!
:: Thursday, 12 May, 2022 ::
I have a wee crisis of confidence today. I found one of those "not-obvious-reasons" that I talked about yesterday.
The Chimaera pages talk about shortening the pinion to fit the lower UJ - otherwise the pinion hits a diagonal brace in the chassis. Well
it dawns on me that the S doesn't have that diagonal brace - so do you still have to shorten the pinion?
First job is to measure the S chassis and rack mounting points.
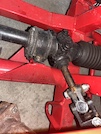 I measure the distance from the rack mount (common to both racks) to the centre of the pinion (between those two bolts holding the plate on)
and then to the line of the vertical tube on the chassis (it's not quite vertical, it leans outwards slightly). Then I measure the width of
the tube and how far back it is from the rack centre line.
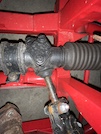 You can see here that there is a carefully-crafted recess (or a feckin big dent) in the chassis to clear the UJ and its clamp bolt.
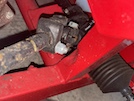 Here it is again from the wheelarch, showing the dent to provide clearance. You can also see that unlike the Chimaera, there's no chassis
crossbrace that limits the length of the pinion.
The distance from the centre of the rack to the end of the pinion is 130mm on the TVR rack, and 180mm on the Subaru rack (mainly because of
the power steering valve housing).
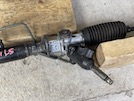 I decide to makee a mock-up on the garage floor. I transfer the measurements to the floor in chalk, and use a block of wood to hold the rack
at around the right angle. Then I put another block on its edge where that vertical chassis member would be. You can see that the end of the
pinion would be well beyond that chassis rail.
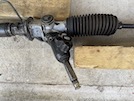 Looking down vertically, you can see that there should be enough clearance, even allowing for the fact that the piece of wood doesn't have
the dent in it.
There's always scope, remember, for additional "percussive easing" of that vertical chassis rail, if necessary.
I also need to remember that the pinion and valve housing have to be removed and turned through 180 degrees to improve clearance for getting
the hydraulic pipes on.
So - it's looking hopeful!
I have ordered a Ford Ka UJ that should fit onto the Scooby pinion shaft (after filing a hex on to it) but alternatively, I might be able to
fit a Scooby UJ and weld it to a Ford steering shaft. We'll see how that comes together when I build the system for real.
:: Friday, 13 May, 2022 ::
Too much time on my hands, that's the problem... I was going to leave this until it was time to fit it to the car, but the Ford Ka steering UJ
arrived today and well... I just had to experiment, didn't I?
First though, let's remember that the pinion has to be turned around 180 degrees, so that the fluid pipes will clear the chassis as they go
into the steering pinion housing.
 I undo the fluid pipes from the pinion, and then the two bolts holding the pinion to the rack (they are bloody tight) and extract the pinion.
There are two spacers or shims just inside the rack - don't lose them!.
Then I put the pinion back in "upside down" (or right way up from here on in) and re-route the pipes from under the rack to on top, and gently
bend them so that they connect back up to the same valves as before.
Right - time for some sums. I measure the pinion shaft with a vernier - it's 17.9mm diameter at several points along its length.
 Here's the end of the Ford Ka steering joint - it measures 16.8mm across the flats.
So, the pinion needs about 1mm filed off on 6 faces - or around .5 mm off each face - to fit that joint. I want it to be as snug as possible
in that joint, so I don't want to accidentally take off too much, so I'm not going to use power tools for this - just a flat hand file and
frequent measurements!
 With the pinion back out, I put it in a plastic freezer bag to keep any metal filings out of the teeth, and tape it up (I did add more tape
around the neck of the bag to seal it better).
 Here we are - the point of no return. I superglue a 17mm nut to the top of the shaft to act as a filing guide - to show the alignment of the
6 faces. There's a pin that goes through the shaft, and I make sure that's across 2 points so that I won't be filing anything off it.
 Then I align the nut with the end of the vice jaws, and start filing with the file straight across the end of the vice, removing the pinion
often to check measurements. I file until the measurement is 17.3mm (half way between 17.9 and 16.8) then turn the shaft round, align the
edge of the nut again, and file until the overall width it 16.8mm.
Then I turn the pinion 60 degrees, again aligning the face of the nut, and file the next 2 faces in the same way. For the last 2 faces, I'm
only going to file one to the hex shape - I'll leave a wee bit more "meat" on the other face to see if I can file a slot for the pinch bolt
later.
 I keep trying the shaft in the joint, and filing wee bits off the flats, until I have a nice even hex that fits fairly tightly. You can see
in this photo that pin that goes through the shaft - avoiding the flats so I haven't filed anything off it.
 And here it is, on the famous scabby old red carpet that has featured on this site since the beginning! I haven't cut the splined end off yet,
so that's as far as it goes. It's tight though (even without the clamp bolt) with no movement - in fact I struggle to pull it off again!. But
I'm happy with that piece of hand-filed precision engineering!
The problem with writing this diary "live" is that you'll make a mistake that comes back to bite you later, and look like a right arse.
That's the tricky bit done though - if I had got that wrong, that's one steering rack written off!
The next steps are to cut the splined end off the pinion, drill the clamp for a second bolt for extra security (although I'll need to wait
until I fit this all together, to see exactly where the joint has to be clamped), then clean and grease the rack and pinion, and refit the
pinion and the hydraulic pipes (if I can bend them to the final shape).
There will then be a lengthy delay before I fit all this to the car, and then work out what track rod ends fit the hubs, what length of
shaft I need to connect all this to th steering wheel, how to plumb from the pump to the rack, and how to wire in the electrics. Mere details!
:: Saturday, 14 May, 2022 ::
Right - on to the next steps...
 First, I cut the splines off the pinion with an angle grinder. Many sparks ensue.
 Then I dig out a couple of clamp bolts, nyloc nuts and spring washers, and fit those loosely for now. Here's the cut-off pinion nicely fitted
to the UJ.
Right - now to reassemble the rack...
 Here's the pinion gear, with the old grease.
 I clean that off with paraffin and a brush, and then re-grease it with new lithium - moly grease.
Then I clean up the inside of the pinion housing (just a bit, no paraffin this time!) and move the rack side-to-side with a screwdriver and
grease the teeth. Then I clean up the two thin shims that I took out of the housing originally, and refit them. Then I refit the housing
"upside down" to where it was before - i.e. with the output connectors (to the rack) on top and the inputs (to and from the pump) underneath.
I put some Loctite on the pinion bolts just to be sure.
The next step is to re-connect up the pipes on the rack. They have to go back to the same valves that they came out of (don't get this wrong
or the power steering will help you turn left when you turn the wheel to the right, and vice versa, and you don't want that!). It takes a
fair bit of time, bending gradually by hand using a long socket as a bend former, little bits at a time, until the connectors line up.
 No prizes for pipe-bending skills, but it's done.
 I might get new pipes made up and fitted to the rack at some point, but this will do for testing!
That's pretty much it for now. I need to measure the taper on the Subaru track rod ends to see if those fit the Ford hubs, or if I need to
buy new Ford track rod ends that fit the Scooby track control arms. Or maybe I'll need to swap the whole Ford track rods on to the Scooby
rack. If I have to, there are Chimaera steering rack arms that fit the Subaru rack at one end, and the Ford balljoints at the other end.
There's always an answer, I just don't know what it is yet!
There isn't now much more that I can do until I come to fitting it all to the TVR! If I knew that it was going to be a bolt-on fit I would
get on with it, but I still have a few bits to fabricate (spacers, hose pipes etc) and sort out the track rod ends and steering column length,
so I suspect it won't be. I need the car on the road for mid-July, if nothing else, and I've got a busy few weeks coming up, for various
reasons, so I don't want to chance it.
:: Wednesday, 18 May, 2022 ::
I know what I can do next! I can make a bracket for the pump! This would be more straightforward if the car wasn't 4 miles from my wee home
garage - but it is, I pop along to take some measurements.
I had hoped to sit the pump on top of the two chassis members behind the radiator (beside the swirl pot) but I'm a wee bit concerned that might
make routing the hose lines a bit awkward unless I put it at the front - and then bonnet clearance looks awfully close!
So I decide that I am going to fit it onto the front of the chassis, behind the radiator, and lower it a bit to give bonnet clearance, I hold
the pump in place while I assess its height and how far below chassis level it can sit without risk of it hitting the radiator.
 On the Astra, the pump is mounted in a cradle that is bolted to the body in 3 places. None of those places fit the S, so back home again, I cut
off the 3 mounting arms, ready to make my own.
 This photo shows the pump sitting in the cut-down cradle. I want that to sit with top of the chassis rail about half-way up the cradle.
So I turn to the home fabricator's friend - angle iron! Unfortunately the next bit was a blur of drills and angle grinders, so I did't take too
many photos. I'll try and explain though.
First I drill a 6mm hole in each leg of the cradle, around 10mm higher than where I want the top of the chassis to be. Then I cut 2 bits of
angle iron to around 200mm long (I'll shorten those later) and drill a 6mm hole in the end of each, and bolt those to the sides of the pump frame.
Those will be the main pump support. The distance between them is 170mm, so I use a couple of wee clamps to hold them temporarily parallel,
and cut another piece of angle iron to around 210mm and clamp that in place at right angles under the sides, around 10mm behind the back of
the frame. That will sit against the top front corner of the chassis rail.
Then I drill another 6mm hole in a leftover piece of iron angle, and then cut it to make a bracket for the back of the cable, and bolt it to
the cradle.
 So now it looks like this. Don't worry about the length of those bolts, those are only temporary.
 Here's the whole mounting bracket without the pump.
I've spent far too long on this today, mainly on an initial abortive attempt to make a bracket without using the Astra cradle, but the pump would
have been 2 or 3 inches too low and probably rubbed on the radiator, so I scrapped that idea and started again. I've also spent a lot of time
re-sharpening drills to make all those holes!
The next step will be to tack-weld this together, and take it back to the car to check it in place, before I drill again for mounting clamps.
My neighbour drops in to see what I'm making, because he's heard the angle-grinder etc. I show him. He thinks I'm mental. He has a point.
:: Thursday, 19 May, 2022 ::
First job today is to tack-weld the bracket together, then fit the pump ad take it along to the car to check that it fits and that it doesn't
foul the radiator. It does the first and not the second, so that's perfect!.
So - back to the house, take the cradle back out and weld it together. I'll gloss over having to take the welder apart 4 times because the welding
wire keeps jamming inside the handle, behind the nozzle. I manage to fix it eventually!
With the bracket welded together, I need to drill holes to clamp it to the chassis. I have a couple of M8 square U-bolts, with 48mm
centre-to-centre (or 40mm between the faces of the 2 arms of the bolt). That should fit snugly to the chassiis which is 38mm square section. So
I mark out the hole centres and drill the holes out - 4mm first then 6 then 8, then eventually 9mm so that the U-bolts will fit through easily.
I also elongate the holes slightly with a hand file to allow for slight adjustment when fitting. Then I cut down the excess behind the mounting
bolts.
 I refit the Astra pump cradle and it looks like this...
 And this,
 Here it is with the pump installed in its bracket. This would be looking at the chassis from above the elft front wheel, with the pump sitting
in front of the chassis rait.
 A closer look from behind...
 and from the front!
 Then I spray on a couple of coats of paint...
 Happy with that!
I also order an 80A fuse and inline holder.
The big question is - when am I going to start installing all of this stuff in the car? I don't really need the car until mid-July, so I should
have plenty of time, but it's not a straight fit and there's still scope for delays. I don't know if the track rod ends will fit the TVR hubs
(although the advice is that they might but probably won't) and the TVR ends don't fit the Subaru rack, because the arms are shorter. You can
re-profile the tapers in the hub, but then you can't put the old rack back in if something else goes wrong. Some Chimaera track rods fit the
Subaru rack, and then you can use the TVR track rod ends.
Second possible problem is the length of the arm between the pinion and the bottom of the steering column. You can't just cut it doen because
it's splined at both ends. Different lengths of arm are available but you need to measure once everything else is installed.
None of that is insurmountable, but life is due to get pretty hectic for one reason or another, starting this weekend, and I might not have time
to faff around with all of that before I next need the car, so I'll leave it till after.
:: Saturday, 21 May, 2022 ::
I've been thinking. This is not always a good thing, but this time, I'll forgive myself.
If I start this mod, but can't get it finished for one reason or another, then, as long as I haven't modified any existing parts, how long would
it take to re-install the manual TVR steering rack for our trip in July? Not that long, surely...
I'm not going to get much chance to use the car between now and then, so if I was to start now, but couldn't finish the conversion for one reason
or another, I could put it back to manual in a couple of hours. Possibly.
The biggest uncertainty now, is how the Subaru balljoints will fit the tapers in the Ford / TVR hubs. The advice on the Chimaera pages is a wee
bit contradictory - some say they fit straight in, others say that the taper is different. Either the first group haven't noticed that the taper
is different, or the second group think it's different when it isn't...
So the safest thing is to use the TVR balljoints... but that's not so simple - the TVR has wee short balljoints, whereas the Subaru balljoints
are much longer, so won't screw on as far. And... is the track of a TVR narrower than a Subaru Impreza so the overall length needs to be shorter
anyway?
Does that mean I might have to change the track rods as well? Apparently later Chimaera track rods (power steering models) fit straight on to
the rack, but they are £25 each so I don't want to buy those unless I have to. But that would be the (expensive) solution if it comes to that.
What I can do is take a balljoint off the TVR and compare it with the Subaru one. See if the taper and the threads are the same. If so, then
we've won a coconut!
If the taper is different, then I need to see if the TVR balljoint fits the Subaru arm - if so, then don't throw that coconut away!
If the whole arm has to be changed, then I can get those ordered, but can't afford coconuts.
What I'm not going to do, is start modifying the Sierra hub by boring new tapers - that's not last-minute reversible.
I have a Porsche meeting tomorrow, but after that, I can swap the cars over, bring the TVR back here, and start measuring and comparing bits.
:: Tuesday, 24 May, 2022 ::
I've brought the TVR back to the garage, just so that I can check and measure what parts fit. That's all, yes. No attempts to fit the new steering
system just now. Just comparing dimensions. That's all.
First question is - do the Subaru balljoint tapers fit the TVR hubs? To check that, I need to take a balljoint off the Subaru rack. This should be
simple:
Spanner on track rod;
another spanner on lock nut;
turn in opposite directions;
wind off balljoint.
Nope. What it turns into is clamping the track rod in a vice, putting on the biggest spanner I can find, rocking the whole garage from side to side
and still not budging the bloody thing. Application of heat results in burnt hand but no movement of locknut. I end up chiselling through the locknut
until it moves, and then at last I can use a pipe wrench to wind the joint off. 16 turns - remember that!
The threads are full of loctite or some other compound (superglue probably) but at least it's off!
 Now to the TVR end... I jack it up on to axle stands and take off the front wheels and the bonnet stay so that I can open it vertically. Then I take
the battery out so that I can see what I'm doing.
 Loosen the locknut, then the balljoint nut - don't take it off just now though, leave it on to protect the threads while I use a balljoint splitter -
then remove nut and wind off the joint - 12 turns this time.
 Here's the two joints, TVR one on the left and Subaru one on the right.
 Right back to those questions. Does the Subaru joint fit the TVR taper? No, it doesn't - it barely starts to go in. No coconuts here. I measure both
joint tapers - there's not much in it, but enough.
Does the TVR joint fit the Scooby track rod? No it doesn't - they do look the same but a bit of experimentation from my box of bolts shows that the TVR
has a metric thread and the Subaru is UNF. I never really liked coconuts anyway.
The next logical step is to check if the TVR steering rods will fit the Subaru rack. This involves a bit of dismantling to get the rack out to measure.
 I mark the positions of the top and bottom UJs on the steering column shaft, and remove the top UJ then the bottom. That lets me get the steering shaft
out.
Then I remove the 4 mounting bolts to the chassis, and manoeuvre the rack out sideways.
 Here's the two steering racks side by side, with the balljoints back on where they were originally. You can see that the rack itself is the same length
but the overall track of the TVR is much shorter.
 So the next question - do the TVR track rods fit the Subaru rack? I strip back the gaiters and it doesn't look hopeful - Subaru joint on top looks totally
different from the TVR one below. Let's be sure though!
I clamp the Subaru rack in the vice, and strip back the gaiter so that I can get to
the inner balljoint. It's held on with two wee locktabs that have to be knocked back, then it just unscrews.
Then the same with the TVR one except that it's in two bits - you have to hold the joint and wind back the locknut slightly, then unscrew the joint.
 Here's the two joints - TVR on the left has a female thread that screws over the rack end, while the Subaru on the right has a male thread.
 Here's the two rack ends - totally different. So the TVR track rods don't fit the Subaru rack...
This, to be frank, is a bit of a bastard.
But do not despair! I started all this by following the advice of the Chimaera boys and girls, who have been able to make this fit despite the fact that
half of them haven't figured out yet how to work the catches to take the roof off. So it can't be that hard... I take a closer look at their photos, and
they show Chimaera track rods with the same ends as the Subaru ones, that screw straight in. I look up "track rods" on TVR parts suppliers, and they're
right - Chimaera track rods will fit!
Hang on though - there's at least 2 different lengths - 290mm and 330mm!
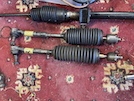 I go back and measure mine - around 320mm (allowing for the inch or so that's inside the balljoint) - so I order 2 of those.
This is humping up the cost a wee bit, but you reach that point where you're just too far gone to stop, eh? I'm now at just over £400, but I think that
the only other bits I will need will be the 2 hydraulic hoses between the pump and the rack. I'll also need to modify the steering shaft between the rack
and the steering column, once I know the length it needs to be, but I'll sort that all out later.
Famous last words maybe, but today, for the first time, I'm pretty confident that this is all going to work!
:: Monday, 31 May, 2022 ::
I haven't had much chance to get back to the TVR over the past week, partly because I need the track rods before I can put the rack back together,
and partly because I've been busy with other stuff for family reasons.
I also need a couple of spacers to mount the rack on. I went to a local fabricator 2 weeks ago, but I think he's forgotten about me so I have to chase that on.
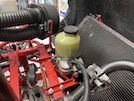 Today, though, I install the pump bracket and then the pump. This means that I have to cut all of the cable ties that hold the electrics to the chassis
cross-tube so that I can tuck the U-bolts up behind them. I also remove the horns just to give a bit more working space.
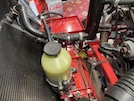 Then I install the rack loosely in place, so that I can use an old bit of fuel hose to work out the lengths of the power steering hoses between the rack
and the pump - 580mm looks pretty close. I'll take the rack, the pump and that measurement to a local hydraulic hose maker to get those made up. Not today
though - our street is closed while they repair a manhole in the middle of the main road!
That also means no parts deliveries!
Next, I can work out how I'm going to wire it in. I need to connect 4 wires - a big main supply with an 80 amp fuse direct from the battery, an ignition
feed that tells the pump to get ready, and then a "trigger" supply from the rear of the alternator so that the power steering only works when the engine
is actually running, and an earth. The main one is easy - the pump is right next to the battery. The earth can fit to an existing earth point on the
chassis. The trigget wire will need to be extended to reach the alternator
I put the bottom steering UJ on to the pinion, and the top UJ on to the end of the steering column. I need the new steering shaft to be around 320mm,
depending how far down the pinion I can fit the bottom UJ without it fouling on the chassis alongside. That would mean shortening the standard steering
shaft by 60mm. I think I'll leave that until the rack is in its final position!
 Jim's car looks bloody good - it's BMW San Marino Blue, and I think it really suits the car.


