:: Diary - March 2017 ::
:: Tuesday, March 14, 2017 ::
Right - this TVR tyre. It has a slow puncture - a really slow puncture - on the offside rear. It's been like that for ages (years, probably) and takes
about 3 months to go flat. You pump it up and it's fine for a 2 or 3 days weekend trip etc. But now, with the car wedged against the garage wall by 2
ton of Chevy, you can't get to it to pump it up. And it has been sitting for 4 months, so it's flat.
Now, pushing a car with a flat tyre isn't easy, especially because it has to come forward at a bit at an angle, so that I can swap the wheel for the
spare, then take the tyre for check and repair. No problem, move the Chevy out of the way, then start the TVR.
After I have spent ages removing covers and folding them away so that they don't get covered in dust on the inside, I scramble in over the passenger
door, turn the key and - it doesn't start - the battery is flatter than the tyre.
Plan B - jump start it from the Chevy. Pull the bonnet release, right hand side pops open, left one doesn't. Usually I open the bonnet by kneeling
beside the door, pulling the release lever and lifting the edge of the bonnet. To do that, I need to have the door open, but it's 2 inches from the wall.
No amount of wriggling, twisting and cajoling will open the bonnet.
Plan C - I move the Chevy out into the courtyard, then start to push the TVR with steering on full lock. It's heavy, the brakes are sticking slightly,
and the floor is covered in concrete dust so I've got as much grip as Bambi on ice. But by placing bits of wood against the wall as "starting blocks" I
manage to get it far enough forward, and out from the wall, to get to the wheel.
I can also get the drivers door open far enough to perform the bonnet-opening manouevre!
Back on course at last!
Then I go to slide the jack under the rear crossmember. Because the tyre is flat, the jack doesnt fit. I can't get it in under the trailing arm either.
Plan D - I use the Goldilocks Principle to select a bit of wood that's not too long to fit between the car and the wall, and not too short so that there's
not enough leverage, but a bit that's "fuck it, that's close enough". I line up the jack with the end of the crossmember, wood under the edge of the
chassis, one end against the floor, brace weight on one foot, lift the car 1/2 an inch, slide the jack under with the other foot, then collapse in an
anaerobic heap to recover, not forgetting to check that the jack is properly located while I'm down there.
Back on course at last!
From here, it doesn't take long to swap the wheels, and extract the jack again (easy now that it's sitting on an inflated tyre).
I can't see anything obviously wrong with the tyre. John isn't around and the workshop is shut, so I can't pump it up to check. I'll have to take it home
to test it.
So then I push the car back into position, reversing the "starting block" bits of wood technique to give a bit of grip.
I'm too old for this. I hurt everywhere.
While I am standing about trying to look as if I'm busy, but really just recovering, this builder walks up. He rents a workshop at the other end of the
farm, and came up to see the Chevy. Then I go down there to see his 1974 Triumph Bonneville - very nice it is too.
Back to put the Chevy in the garage, a bit easier than the first time, I know where I am aiming its arse now. Trickle charger on the TVR, covers back on
both cars, and I am just loading stuff back into the Land Rover when John appears and looks at the tyre.
"What you doin with that?"
"Slow puncture - need to take it home to find it."
"Naah stick it on the compressor - look"
He pumps it up, we hose some water over it, and we see a bubble from the valve. Just one. I have brought some soapy water mix for just this purpose
(assuming that he would be here and I could use the compressor earlier), so I spray that - yep there's a bubble from the valve every few seconds.
He takes out the valve core, screws another one in, pumps it up again and voila! - no leak.
So that's the tyre sorted, ready to go back on, after another two-car shuffle.
Not today though - Why could he not have come back 15 minutes ago?
I'll let the TVR battery charge up - next time should at least be easier!
I need to let myself re-charge as well, and that could take a lot longer…
:: Friday, March 17, 2017 ::
Haven’t been back along to the car - the weather hasn’t been great, and I don’t want to shift the Chevy outside in the rain - it seems to let in more water
than the Titanic.
So instead, I thought I would give a wee update on progress with the pedal car (remember that from 2 years ago?) I bought it, dismantled it, and forgot
about it. I have a grandson who is now 6 months old, so I though I maybe better get this ready for him before he’s 26…
So I started by stripping off the paint, I wasn’t sure whether to use stripper, sandpaper or a chisel, but eventually settled on a flap wheel in a
cordless drill.
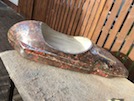 After a couple of hours, it looks like this - it’s a start! It has been about 4 different colours over its life, starting with red, then blue, then
white, then the thick yellow Dulux.
What I didn’t photograph was the inside of the garage, which is now covered in a film of yellow dust… and I haven’t done the inside of the car yet.
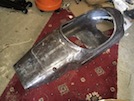 I decided to hand it over and get it soda-blasted - that took a day but removed every trace of paint, and after a wipe-down, it looked like this.
There’s a fair bit of surface rust under the paint, I think it has been left for years exposed to the elements, only protected by various bits of
heavy pointy scrap that have resulted in a number of dings and dents, especially around the rear and the flat bonnet area.
So I get out the old panel-beating tools - I haven’t used these for years! Wee flat hammers and hand-held dollies rule! After much ding-ding-dinging
and thump-thump-thumping, the basic shape of the rear is much better. The bonnet area is a lot more “bouncy” though, and needs more work to get the
dings out.
I give the bonnet and the rear a light spray of grey primer - it’s very hard to see dings and imperfections on bare metal, when light is reflecting
all over the place - a nice flat grey finish makes them much clearer. I leave that to dry before I do any more panel beating.
:: Saturday, March 18, 2017 ::
Still pishing rain, so I have another day in the garage with the pedal car.
The grey primer has dried, and highlights where there are still dents needing a bit more work.
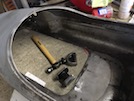 Here’s the tools for the job! Well some of them - I’ve got 3 hammers and 5 dollies but I not’t really know what they all do - what I need for this is a
flat hammer and one or other of the curved dollies - that’s all I know…
The rounded bit of the rear was pretty bad - maybe a previous owner had a toolbox or something that he pushed against it - or maybe the driver was a
trainee Ken Block who kept reversing into things - but either way, it was pretty battered. I got the basic shape back yesterday, so today I can straighten
out the smaller dings.
The other bad bit is the top of the bonnet - as if things have been chucked on top. Again, I flatten out some of the smaller dings.
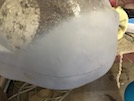 Then I give those two bits another wee spray of primer, just to check. Here’s the rear…
 And here’s the bonnet. The three little holes are for the air scoop to keep your legs from overheating when you’re pedalling at max revs.
Once the primer has dried, I sandpaper it all off again, and also sand down the rest of the car to give the filler and final primer and paint a good key.
Then I apply a light skim of filler to these two areas, and leave it to dry.
When I sand down the filler with a block, there are still a couple of low spots, so I add another thin layer and leave it to dry.
It’s already looking much better though!
:: Tuesday, March 21, 2017 ::
It’s the official start of spring! So naturally, it’s snowing…
I was going to swap they tyre back onto the TVR, but that means I need to shift the Chevy out into the farmyard first (and I need to get to the farm in
the first place, but that’s a secondary consideration when you have a Range Rover - provided that nobody else has skated into the scenery and shut the
road - there has been rather a lot of that this morning…)
Anyway, back to the pedal car. I spent a bit of time over the weekend rubbing down and then spraying on a filler primer, which I then mostly sanded off
again to get it nice and smooth.
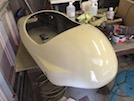 So this afternoon, I added another couple of coats of filler primer, and I’ll leave those to dry before a final rub down.
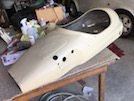
I haven’t really sorted the inside - it’s more awkward to access so I am going to apply a rust converter and then paint over the top of that.
:: Saturday, March 26, 2017 ::
The task today is to get the TVR back to the house, and the Porsche along to the farm. But first, I need to change the wheel on the TVR so I need to take
the trolley jack, and that doesn’t fit in the Porsche. Well it might, but there’s another complication - the Range Rover was left with its sidelights on
for 24 hours yesterday, and although I left it on charge all night, there still isn’t enough oomph to start it. And it’s parked in front of the garage
door…
Right you need to pay attention now, because this is going to be like one of those puzzles where you can only move one box at a time.
First step is to start the Chevy, drive out into the street, turn it round and drive back in, and connect up the jump leads. A wee wedgie in the throttle
to keep the revs up, leave it a minute and the Range Rover starts… Now it needs a wee run to charge the battery properly…
So take the Chevy out, turn it round and put it back where it was, put the jack and jump leads in the RR, and go for a drive.
After half an hour so, I get to the farm, and park the RR where I can get another car up to the bonnet. Then start the TVR and take it out into the
courtyard. Then I jack it up, and swap wheels, and put the space-saver back in the garage, and the jack back in the RR.
Back in the TVR and drive home… Park the TVR in front of the Chevy, and extract the Porsche from the garage.
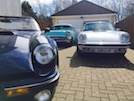 Then I realise that this is the first time all 3 cars have been in the same place at the same time.
Right, with the family portrait completed, I drive the Porsche along to the farm, and before I put it away, I make sure the RR actually starts.
OK - manoeuvre Porsche into barn, put the covers on, remember (just) to take out a few bits of stuff I might need, and head home in the RR.
Then I go for a drive in the Chevy, which was the original plan about 3 hours ago…
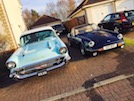 When I get back, I wash the Range Rover, then the TVR, and park the TVR in the sun to help it dry. Little and Large!
So that’s a start made, at last, on getting the TVR ready for next weekend’s TVR Car Club!
 After a couple of hours, it looks like this - it’s a start! It has been about 4 different colours over its life, starting with red, then blue, then
white, then the thick yellow Dulux.
 I decided to hand it over and get it soda-blasted - that took a day but removed every trace of paint, and after a wipe-down, it looked like this.


