:: Diary - September 2024 ::
:: Sunday, 1 September 2024 ::
It's TVR Car Club day! But because my garage at home is currently full of an immobilised Porsche 3-wheeler, I had to go along to the farm yesterday
to bring a TVR to take... But which one? First world problems eh? I settle for the S3, so I bring that back to the house and give it a bit of a wash.
Just as I finish that, a friend calls and says that their Ford Focus ST broke down on Friday night, and the AA man said that it needed a new earth
cable between the engine and the chassis - the existing one is frayed... Now it has blown a fuse so he needs to replace that. I tell him to go to
Halfords and buy an earth strap the right length, and then bring it up to the house.
Now this ST has just had a very extensive (and expensive!) engine repair, and it hasn't been quite right since. I don't really want to get into it,
because if they have a dispute with the repairer, it's nothing to do with me! Anyhow, he pitches up and I advise him on how to remove the old earth
strap and fit the new one - he wants to do it himself.
Thing is, the old earth "strap" looks like 30 amp wire with a relatively new (and very badly fitted) crimped connector in the middle. The cable is
nowhere near beefy enough to earth the starter and charging current, and the unneccessary shite extra connector doesn't help. The new
one is a proper braided strap which is guaranteed to provide a better earth for the various engine sensors etc. With that fitted, he starts it up
and says that it seems to be a bit better. It's been remapped some time ago, mind, so its idle is a lumpy as school custard.
Anyway, off he goes, and I finish getting the TVR ready for today.
Today, I'm meeting up with Dave and Eric for the run thrugh to the meeting. Jim is making his own way. When I turn up at Dave's house, he takes me
into his garage to show how he is getting on with dismantling his Griffith's engine, after it went "bang" big-style last September.
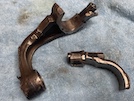 Here's one of the piston connecting rods. They have to be straight, but he suspects that this one might be bent beyond the acceptable tolerance
specification. I don't have any measuring equipment with me, but I suspect he might be right...
The rest of the engine is, not to make this explanation too technical, fucked. There's bits of piston where they shouldn't be, bits of engine where
bits of the sump should be, and the engine block has several holes and bits of embedded ironmongery. His next task, then, is to figure out how to
repair it.
Eric turns up, and after a short blether, we're on our way - straight to the venue this time because we haven't left time for a mini-tour and the
weather isn't that great anyway. Along the way, we encounter the usual motorway morons - for example a BMW that comes down a slip road, flies out
behind me and in front of Dave, straight out to the right into the BMW lane for about half a mile before he chops back in to go down the next slip road.
Oh that reminds me - when I was bringing the TVR back to the house yesterday, I went for fuel and was coming down a slip road onto the main dual
carriageway behind a learner - I was turning right at a roundabout about half a mile further on, so needed to change lanes after a couple of cars
had passed. I picked a gap in front of the third car, a BMW that was miles back but hoofing it, but the learner moved out first - fair enough I
thought, plenty time for speed adjustment etc. No... Mr BMW leans on the horn, the learner shits it, I end up having to slow in the nearside lane,
BMW man is yelling out the windscreen, looks over at me and start shouting at me for some incomprehensible reason... then he cuts back in front of
me, zooms past the learner on the left, then flicks back out to turn right at the roundabout.
You try not to have stereotypes, but... BMWs...
Anyway, back to today - a bit further on, we are passed by a very nice old Ferrari 275 GTB. It's lovely.
We get parked up and order lunch. Jim is already here and Hugh turns up as well, which is nice.
Usual chat, blah blah blah... We're going to a local show next Saturday, so we make arrangements to meet up for that.
Then it's back home, via the farm to drop the TVR off before the rain starts.
PS. TVR Running Report - it seems to be running really well, very smooth, pulls well from low revs, no obvious problems. Better than that, I really
enjoyed my wee drive out in it today, it's a fantastic wee car.
:: Tuesday, 3 September 2024 ::
Update on the Porsche brake caliper: it wasn't in the stock delivered to the supplier on Friday, so it will now reach them on 30 Se[tember and be
sent out to me shortly after that. Now logically, there's no great hurry to get it fixed, since the main season for driving sports cars has passed,
the road tax has now expired and its MOT isn't due until then anyway.
The main reason for ordering a a new caliper was that the old one is siezed solid - you can't move the pistons even with the air compressor turned
up a bit.
However, my back's a lot better, I've got nothing better to do today, so I decide to attack the caliper with a little more "vigour". If I can get
the old pistons out, I can clean the caliper up and get new pistons and seals etc within a few days. Oh, and save over £100. That definitely appears
logical, captain.
So I get it clamped into a vice, rip off the piston dust covers and spray some penetrant around the edges, then lever both pistons back into their
bores. Insert wood block, apply air pressure, and one piston moves out a bit, the other one is firmly stuck.
Repeat.
And again and again and again.
One piston is now moving relatively ok when pressurised, the other is still stuck. G-clamp the "moving piston" to stop is flying out, still no
movement in the other one...
Right, ya bastard. I decide that the pistons can be sacrificed, as long as I don't score the bore in the caliper. The stuck piston has a wee "lip"
on the face so I spray more penetrant and knock it round about 1/2 a turn with a hammer and blunt chisel, spray again and knock it back the other
way. After a couple of repeats, it's turning a bit more freely so...
back in with the wood block, back on with the airline, and it pops out very slightly - enough to get pump pliers on the front edge and apply a bit
of direct pulling force...
It's out! Then I pop out the other one, and clean up the bores and take out the seals.
The caliper bores are fine, although there's some corrosion around the lip. I sand that off, being careful not to sand into the bore behind the
seal notch.
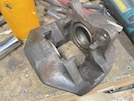 Here's the caliper after I have cleaned it out with brake cleaner and an airline.
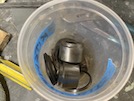 and here's all the pistons and seals etc that I took out.
After cleaning them up, I put some new brake fluid on the pistons and slide them back in - everything seems to be moving nicely now! Definitely
salvageable! So I go back indoors and order a seal kit, 2 pistons and a brake nipple (not strictly required but sod it), and cancel the caliper
order. About half an hour later, they tell me that it's all despatched, and due for delivery on Thursday!
Back out to the garage, I fire up me wee blast cabinet - it's not sand that's in it, it's wee glass beads - perfect for removing dirt and surface
rust, without doing too much damage.
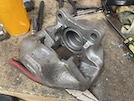 I plug up the brake inlet hose connection, then after half an hour, I've got it cleaned up to this stage. I clean out all the residual dust with
brake cleaner and an airline - perfect! I was going to paint it, but they were never painted in the first place, so it'll do as it is.
I won't be able to refit this late on Thursday because I'm just too busy, even if it arrives on time. Saturday and Sunday are out, so it's Friday or
bust! (or next week I suppose, but who wants to wait that long?
)
It's not the money saved, it's the satisfaction of fixing something yourself, and the convenience of getting the garage back so that I can get on
with something else (like the Vixen's carburettor, for example).
I'm a liar. it's about the money.
:: Thursday, 5 September 2024 ::
The original parts order (for the brake pads and new locating pins) were delivered yesterday. I get a text from DHL this morning telling me that
the second part (the caliper seals etc) is due to be delivered today between 11.30 and 1.30.
So at least I can start on replacing the pads in the other caliper. Wheel off, then disconnect that brake wear warning wire and knock out the two
locating pins. Then I push back the pads slightly and remove them. Then swap over the brake wear indicator, a smear of copper grease on the rear
of the pads, put them back in, hammer in the new pins and reconnect the wear wire.
That's all that I can do until the other package is delivered. Just as I am finishing tightening the wheel back up, I see the DHL van in front of
the garage - he hands me the parcel - talk about "just in time" delivery - it was spot on, to the second!
First I take the caliper and wipe out the insides to remove any dust. Then I put in the new seal, lubricate the first seal and piston, and slide
the piston into the caliper. The piston has a cutout on the front that has to be aligned at 20 degrees to the angle of the disk rotation.
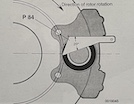 The manual says you need a special Porsche tool to set that angle - you hold one edge agains the edge of the brake pad aperture and set the piston
to the right angle. I don't have that special tool. What I do have is a bit of cardboard, a pencil, a protractor and a pair of scissors.
I line up the piston and push it almost home, and then fit the piston dust cover.
Then the same for the piston on the other side of the caliper.
Sounds easy? Well, getting that angle right, and then getting the dust covers on, wasn't easy, and involved a few repeats of popping the piston out
a bit with air pressure and lining it and the dust cover up again!
Anyway, eventially the caliper is re-assembled, and ready to fit!
Bolt it onto the bracket, then fit the new bit of brake pipe that I made last week. Then fit the pads and wear connector, as per the other side.
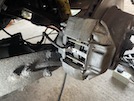 Finally I need to bleed it with the vacuum bleeder - a bit of copper grease around the nipple (to avoid drawing in air) and it's done!
Then I can refit the wheel and lower the car to the ground.
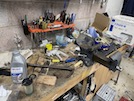 The inside of the garage looks like someone has emptied a skip over it... that takes me nearly as long to tidy up as the job did!
But it's sorted, ready for a new MOT appointment. Just as important, it's ready to take along to the farm and bring a TVR back for this weekend!
Not today though, because I have a few other things to do before and after dinner time.
:: Saturday, 7 September 2024 ::
Yesterday, I took the Porsche along to the farm, and brought the Vixen back, ready for a wee local show tomorrow.
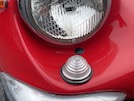 As I'm taking the cover off, I notice that one of the front side light covers is loose. It's only held in with the rubber seal, and then a metal
trim ring that is also supposed to tuck under the rubber. Except it doesn't, because the headlight bowl is slightly curved, and the rubber is meant
to sit flat. The other one is hanging on by the skin of its teeth as well...
They look like Land Rover lights - I'll check....
So this morning it's out to the garage to pack stuff in the car - 2 jackets depending on whether it rains or not, a hat ditto, tools and other
assorted shit.
Go to start the car - nothing. Just that little "plink-plonk" that you get if your batter is flat or if the starter is jammed... well I know that
the battery is charged, so I put the car in gear and rock it. No difference.
Belt the starter with a hammer. No difference. Belt the solenoid with a hammer. No difference.
Right... bring out wide pinch bar, short across solenoid terminals - starter turns. Back in car, check in neutral, ignition on, choke out, jump out,
short terminals again - it starts. Add starting handle / pinch bar to other shit in the car, and we're off to meet Dave and Jim 10 minutes up the road.
 We arrive at the show and get parked up. First stop - the bacon roll van!
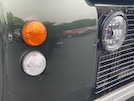 Then I'm off on a mission comparing front side lights. Here's a Land Rover...
 and here's a classic mini. I measure them both to confirm that they are roughly the same size, but with screws so that they can't just pop off.
I order a pair of Land Rover side lights, and a Ford Cortina / Escort starter solenoid, in between talking to folk who stop to look at the car.
 My wife has recently started up a small business selling cupcakes for parties etc, and I've brought along promotional samples for the boys. They
keep us going through lunch time.
 These arrived right behind us and were parked beside us. They are Novas - VW Beetle based kit cars that look like racers but sound like VW Beetles.
Nice though!
 I took loads of photos, but I'm not going to post them all here, but this was interesting - it's a Microlino electric bubble car, brand new, first
registered in August, so less than a month old. Apparently they have a top speed of around 55 mph, and can do around 150 miles on a 4-hour charge.
 We're also impressed by the negative front wheel camber on the Hillman Imp.
 This is a drone photo (not mine) of half of the show - there was another similar area around the other side of the building. This must have been
taken later in the afternoon because people have already stared leaving. You might be able to see the three red TVRs at the top centre of the photo
- there's an ice cream van, a red and yellow burger van, then a Mk1 Cortina GT in Lotus white / green colours, then a JBA kit car and then us! If
you have CIA/FBI photo enhancement software you'll recognise me and Dave standing there too.
Then it's back to the manual pinch bar starter, and we head for home!
:: Wednesday, 11 September 2024 ::
On Monday, I decided to try to diagnose what's wrong with the starter solenoid, in case it's something simple. I tried it 15 times. How many times
did it stick? That's right, you guessed it - none.
So I tried it again yesterday - 12 tries, all perfectly fine. TVRs are, indisputably, right bastards...
Also yesterday, I phoned about the insurance for the S - why is the renewal quote over £100 dearer than the "new business" quote for exactly the
same insurance, through the same insurer and broker? After a bit of flustering and running off to check with managers, he comes back and says that
some of the information is different... on one of them, I've put "civil engineer" and on the other I've put "company director" - well, both of
those are correct, go for whichever is cheapest.
On one, I've limited the mileage to 3,000 per annum, and on the other, 5,000. Ok, put 5,000 then.
No other differences...
Off he trots for another 5 minutes and then comes back and says that it's now even cheaper than the online quote... So for the price of a
20-minute phone call, my insurance is now less than half of what the renewal quote was. There's still no explanation of why the renewal quote was
so expensive, but ok we'll go for that.
Then he asks if I want it to auto-renew next year. I say "what do you think?" That'll be a "no" then.
So with the insurance sorted, I have to re-establish a agreed value - it's more than 2 years since I last sent them photos. So I dig the car out of
the garage and send them some new pictures.


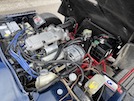


While I'm doing that, the postman delivers the starter solenoid for the Vixen, so let's test that again eh? This time, it starts once, then sticks
several times, then suddenly starts again. I try it with a separate ignition feed wire direct from the battery - it still sticks sometimes, so it's
not the rest of the car's wiring! Let's get that swapped eh?
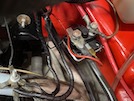 Here's the old one, on the nearside inner bulkhead. First I disconnect the battery
earth then positive, then disconnect the cables from the solenoid.
It's held on with two wee setscrews through from inside the footwell, with tiny washers and nuts on the engine side, with an earth wire on one of
the screws. Fortunately, the car is so tiny that you can reach the footwell and the engine bay at the same time... although it's fiddly! With the
new one screwed in place, I reconnect the leads and the small wire from the ignition switch.
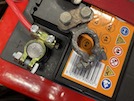 As I'm connecting the battery back up, the positive terminal bends and crumbles. Fortunately I have a new one, so swap those over.
Time to try it out - and it seems to be consistently working! Time will tell...
:: Thursday, 12 September 2024 ::
Back to the Vixen sidelights. The postman delivered the new Land Rover ones today, so let's have a go...
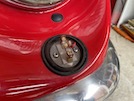 First I take off the metal trim ring and plastic lens cover - this isn't difficult, they practically fall out when
you look at them.
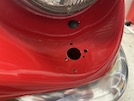 Then just remove 2 screws and take off the light unit, and clean up the paintwork. It looks like it has had a variety of side lights fitted during
its life - only two of those holes (the smallest ones) were holding these units on.
With the light unit flat on a table, I refit the lens and trim ring - they are quite secure when the surface is flat (like on a Land Rover) but
rubbish when it's curved.
 Then just remove 2 screws and take off the light unit, and clean up the paintwork. It looks like it has had a variety of side lights fitted during
its life - only two of those holes (the smallest ones) were holding these units on.
 The new units are the same overall diameter, but the bulbholder part is much thicker. I measure the new units and make a cardboard template to show
what size that internal hole needs to be. You can see that I need to grind the hole out about 1/4 inch all round.
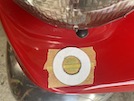 Then I put some masking tape over the hole so that I can mark up the new hole size.
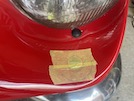 Here you can see exactly how much needs to be removed so that the new light will fit.
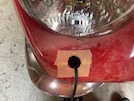 I use a ball die in a grinder to enlarge the hole to the marks, and keep nipping bits off until the new unit just fits.
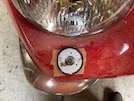 Then I fit the new units in and mark the three screw holes.
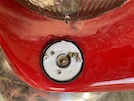 I drill the mounting holes and then use three new self tappers to hold the unit in place.
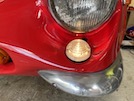 I screw on the lens covers and connect up the wiring to the new units, and here we go! Working side lights that aren't held on by a wee flimsy
strip of bent rubber!
:: Monday, 16 September 2024 ::
After a weekend away from the car (I was at a wedding, best gear and everything), I've just re-read my post from Thursday there, about the new side
lights, and you know what? It's a load of waffling twaddle. You take a simple job - take out the old side light, make the hole bigger, screw on new
lights with a bit of wiring mods - and you turn it into War and Peace...
Wednesday - a rambling stream of semi-consiousness about insurance and then changing a starter solenoid - 2 wee bolts and 2 terminals, Jeees, a child
could do it.
The previous week - a Porsche brake caliper and a car show...
So I've decided to try to be a little more focussed. So here goes:
The Vixen's tachometer has had an intermittent fault since I got it - it suddenly reads zero for a few seconds and then jumps back into life.
It stopped working altogether on the way back from the TVR Club meeting on 1 September and hasn't flickered since.
Today I remove it from the dash and check all the wiring - all connected where they should be, all getting power / earth / continuity where they should.
Conclusion: the gauge itself is fucked.
I refit it just to fill the 4-inch hole in the dash, and wire it up again just in case it resurrects itself unexpectedly.
Anybody know anybody selling a Mk2 Cortina GT / 1600E tacho?
:: Thursday, 19 September 2024 ::
I found a Mk2 Cortina tacho on ebay, and it arrived today!
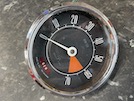 It looks good, all clean and shiny. no cracks, no corrosion on the face.
Unfortunately, like a bodybuilder with all the muscles but too many steroids, it doesn't work where it matters. Nope, this one's needle can't get
up either.
I only discover this after I have taken the dash apart and wired it in, and started the car. Nothing, not a flicker.
This causes me to doubt that I've checked the wiring properly, so let's go through that again.
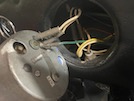 There's 3 wires and an earth. The green wire is an ignition feed - that's easy to check with a voltmeter. The gauge casing has to be earhed - that
can be sorted temporarily with a flying lead with croc clips. There's also two bulb holders - one for gauge illumination, and one for the ignition
warning light - we can ignore those for now.
The two white wires go to the coil and the distributor respectively. They connect to a loop of wire inside tha gauge, that runs through a wee coil
and picks up the electrical impulses going through the LT wire between the points and the coil, by induction - Michael Faraday, magnetic flux
and all that O-level physics shit. I remember nearly 50 years ago (not long after my own O-level physics) converting a Mk1 Cortina from positive to
negative earth, to find that the tacho didn't work - the way to sort it was to take that internal wire off and loop it the other way - so I know
how that works! The car won't run if those are disconnected, so they must be ok, but I check anyway - I disconnect them, and the car won't start.
I connect them together, bypassing the gauge, car starts... so all the car wiring seems ok.
So now I have 2 duff tachos... brilliant... I am so happy.
I also have 2 choices - I can either keep buying tachos of doubtful provenanc, and hope that I get one that works (some of them say "tested and
works ok" but are twice the price of the one I bought... now I know why), or I can have a go at fixing one of the two that I have here, on the basis
that if it's already fucked you can't make it any fuckeder. Option 2 seems to be worth a try!
Don't have time for that today though - I need to do some research first into repairing this type of gauge.
:: Friday, 20 September 2024 ::
First things first - got news today that Adrian has just become a dad! Great news.
This news arrives just as I have pulled a TVR Vixen / Ford Cortina tachometer to bits. After a bit of research, I've decided that there are 3
options:-
Option 1 - send the tacho away for repair. No fun in that.
Option 2 - find out what's wrong with the tacho and buy the necessary bits to fix it as per original. It seems that there are 3 main reasons why
these tachos fail, all related to age. It can either be a resistor, a transistor or a capacitor. Well, that covers just about every component in
the tacho except for the needle... That could be an exasperating option eh?
Option 3 - you can buy a kit that replaces the old circuit board completely, but still uses the original case, face and wiring. If you add the cost
of that kit to the cost of the "spare" tacho that I have, it's still cheaper than Option 1. And more fun.
So I think I'll go for option 3, but first I have to check that it's compatible with my tacho, and that the moving coil and needle still works. Time
to get fiddly with the wee screwdrivers again!
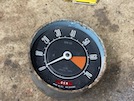 First step is to take the bezel and glass off. It's held on with wee "tangs" and all you do is twist it until the tangs disengage. The bezel comes
off, with the glass and a rubber seal. Then there's a black metal inner bezel that's rusted in place - but it gives in eventually.
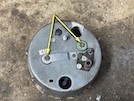 Next step is to take the mechanism out of the case. Remove these two screws here, and it comes out the front.
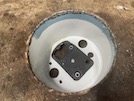 Here's the case - rusty rim and a wee pale blue bit that seems to be there to soften the panel light illumination.
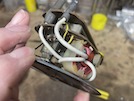 Here's the mechanism, showing the two white wires (or one white wire with a terminal at each end) going therough the induction coil.
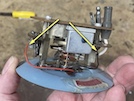 These two red and black wires are the outputs from the circuit board, and they "drive" the indicator needle. I need to test that first - no point in
replacing the circuit board if the meter coil doesn't work.
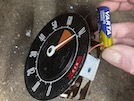 To do that, I snip those wires off the circuit board, and hold a wee 1.5 volt battery across those terminals. The needle zips round to 7,000 revs.
So that works, at least...
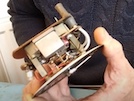 To check compatibility, here's a still photo from a video showing them fitting this same kit to a tacho from a Triumh Stag - you can see that the
mechanism is identical - hardly surprising since mine also has a "Smiths" sticker and serial number on the outside of the case.
So if the wiring into the gauge is ok, and the needle works ok, it has to be the circuit board, right? So it looks like the repair kit will work,
so I'll get that ordered, but while i"m here...
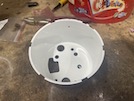 I give the inside of the case a quick spray of white paint...
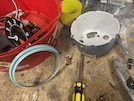 and I also spray the inside of that inner bezel to match the original colour - or rather, to match the 1957 Chevy I had, which seems close enough!
As you can see, my resolution to maintain focus and write less random pish, didn't last long...
:: Tuesay, 24 September 2024 ::
The Porsche had its MOT on Saturday - as usual, it passes, albeit with advisories because the front tyres are bloody old and perishing a bit. He
points out another couple of non-MOT items he noticed - the offside rear brake backplate is corroding, and the nearside heater duct is rusting away.
I take the car back to the farm but I'll need to look at those when I get the chance.
The repair kit for the Vixen tacho was delivered on Sunday (not bad seeing as it was only ordered at about 4pm on Friday).
So today, it's fiddly electronics time!
I haven't taken photos along the way, because they're set out in the kit instructions. If you really want to see the repair procedure, they also have
an instruction video, which you can see here if you have a spare half-hour.
So I've already got the tacho in bits, so today I complete these steps:
remove the white induction wire between the two connectors, that loops through the induction coil;
remove the coil from the circuit board to make room to;
hot glue the new circuit board to the back of the dial, making sure it's not in the way of the ignition warning light;
connect 2 wires to the needle moving coil and stick the connectors to the back of the dial;
solder the red wire to the old yellow wire leading to the ignition feed spade terminal;
fit an earth terminal to the black wire and fit it under one of the original circuit board mounting screws;
fit a male bullet terminal to the blue wire and hot glue it in place of the old connector;
make sure none of these wires interfere with the movement of the needle.
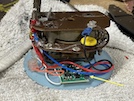 So here it is! That tiny circuit board replaces all of the old circuitry, which is now disconnected. Only the coil that works the needle is retained.
The wee button on the front (arrowed) is used for calibration.
Calibration is simple, and again set up out in the instructions. You connect the spade connector and earth to a battery, and use that wee button to
set the needle at 500, 1500, 3000 and 5000 revs, then you set if its a 4-cylinder engine, or a 6 or 8 cylinder. Then you set it for negative
earth, CB points / electronic ignition.
And that should be it!
 Next step is to re-install the mechanism back into the case, then refit the seal, glass and bezel.
And that's it ready to refit to the car!
First, though, I need to modify the car wiring slightly. The old gauge has the ignition sensor coil wired between the ignition switch and the coil
positive terminal - the gauge picks up pulses in the coil input as the magnetic field collapses after each spark. If you disconnect the tacho,
the coil gets no supply and the car won't start.
This circuit board needs a constant supply to the ignition coil, and takes its signal from the contact breaker terminal on the coil. The
supply is sorted by connecting the two white wires tgether, that previously went through the tacho. I need to fit a new sensor wire between the CB
terminal on the coil, and that new bullet connector on the tacho.
The wiring on the car is bound by that spiral plastic binding that you used to get on old cars, so it can be unravelled without damage. I push a bit
of blue wire through the bulkhead grommet and bind it back into the loom with the old plastic binding.
Then I put a spade connector on the coil end of that wire, and a female bullet connector on the gauge end. Then I check all the wiring again - that
the earth is good, that there is an ignition feed to the back of the gauge, that the two old white wires are connected together so there is a feed
to the coil, and that there is continuity in the blue wire from the coil -ve terminal to the gauge. Then I connect it all up to the gauge, start the
car and... it works!
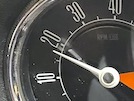 So I reinstall the gauge back into the dash, with the panel light feed and the ignition warning light. Here we are at fast (cold start) idle! All good!
That was an unconventional but interesting repair, with a combination of mechanics, electronics, soldering, etc. Ok the gauge looks standard but it
doesn't have standard internals - all the magic is done by that tiny wee circuit board, and only the needle and its moving coil, and the connections
on the case, are retained.
I'm a happy pixie! This has all been good occupational therapy after the weekend we've had - various difficult family news, plus my wife left for
Turkey yesterday to see her brother who took very ill on holiday. He's on the mend now, but all very scary for a few days there. Which just goes to
remind us all that you have to enjoy what you can, and make the most of the time you have. And playing with old cars is one of my favourite ways to
pass the time.
So what's next? Well I have to service my wife's VW Beetle (the new one with a 2.0 engine that's basically a Golf GTi in a vintage frock), I need
to check out the Vixen's transmission to check if the backlash I feel is in the diff, the propshaft or a driveshaft, and I think I'll also finally
try to fix the driver's door hinges in the S - a task that's been on the list for nearly 20 years but never at the top of priorities, mainly because
I think it will turn out to be a howler. But what is life without challenges eh?
Oh and I think I'll sell the Porsche for the fourth year in a row... that could be the biggest challenge of all. This time, though, I've at least
got as far as posting an advert!
:: Friday, 27 September 2024 ::
The Porsche has had a fair bit of interest but no offers yet. I'm in no hurry - I'll see how it goes.
Other than that, I've had most of the week off from fixing wee sports cars. I have, however, serviced the Beetle on Wednesday after downloading a
service schedule, and just going through it. It's in pretty good nick for a 23-year-old car - only 48,000 miles and a new MOT last week so no major
suspension checks required.
Today I decide to have a closer look at this diff backlash in the Vixen. Once I lift it and get underneath, I find that there's no play in the UJs
in the propshaft, or at each end of each driveshaft. There is, however, some play between the left and right ends of the nearside driveshaft. It
has splines in the middle, covered by a runner boot, and there's the slightest play in those splines.
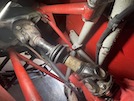 I put a spanner on all the flange bolts to check that they are tight. The inner ends of both driveshafts aren't. The flanges aren't obviously
waggly-loose when you twist them, but the bolts definitely turn too easily. I tighten all of those up.
That's not going to drown out the backlash I can feel in the diff, but it won't have helped either!
I measure the length of the gearbox from the engine flange to the back of the bellhousing, and then to the rear oil seal, and also note the
gearlever position. I can't remember the measurements but they're written down out in the garage. I'll measure the 5-speed box in the S to see if
one of those fits... might be handy to know one day...
I also had lunch with a pal today, who has a Marcos 1.6 Ford crossflow, and the rev counter has stopped working. Coincidentally, the rev counter is
from a Mk2 Cortina. Coincidentally, I am able to advise him of a relatively easy repair (and even maybe, coincidentally, where he can get another
one to repair and swap into his car...) Life is full of coincidences eh?
:: Sunday, 29 September 2024 ::
When I get up this morning, I decide to take the Vixen for an errand to the shops. 50 miles later, I'v passed around Edinburgh, stopped for fuel,
then through Peebles, back along to Carnwath, and home. The shop that I set off for is in completely the opposite direction, so the "wee errand"
remains undone! I have however had time to think about the meaning of life, friends and family.
This wee car is amazing. It's not fast, as I've said before, but it buzzes along these A-roads and B-roads with a lot of fun. This is one of the
few tims I've driven it this far solo, not in a convoy, so it's easiier to maintain your own speed (although to be fair, our TVR convoys all seem to
settle at those same speeds anyway).
At one point, I sit at exactly 60mph (speedo reading, but GPS wasn't far off the speedo on our last trip) and note the rpm as around 3,150. Later
at night, I calculate that for my tyres, and assuming a 1:1 4th gear, that equates to a diff ratio of 3.89 - the second shortest Triumph
Spitfire / GT6 ratio you can get. They also did a 4.11, which would give 3.300 rpm at that road speed. Other available ratios are 3.63 (2,900 rpm)
and 3.27 (2,650 rpm at that speed). Obviously, lower ratios can help reduce the racket when you're cruising along, but can seriously damage
acceleration!
This isn't exactly conclusive and depends on the accuracy of the speedo and the rev counter. A more scientific measurement is required!
I also stop for a couple of photos.


:: Monday, 30 September 2024 ::
Right - about this "more scientific" method of calculating the diff ratio. I had a go at this before, but struggled to count the nuber of turns of
the tyre and the propshaft at the same time. I need an "automatic propshaft counter" while I turn the wheel.
The technology is simple. I put a red mark on the diff flange when it's at the bottom. Then I mark the inside of the tyre (where I can see it from
underneath) with a wee white sticker in line with one of the suspension bolts. Here's the counter bit - I tie a (long!) bit of string to one of the
propshaft UJ flanges.
Then block one tyre so it can't turn at all - that means that the second wheel turns at "double speed" as the diff compensates for that stationary
wheel. Then turn the free tyre by exactly 20 revolutions (which is the equivalent of 10 revolutions of both wheels if the diff was free), and feed
the string onto the propshaft.
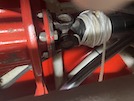 And this is what you get. The red mark on the propshaft is back to almost exactly the bottom - just about a tenth of a turn too short. Then I unwind
the string one turn at a time - there's just under 39 turns of string.
So - 10 turns of the wheel = just under 39 turns of the propshaft - diff ratio is 3.89 after all! That's the standard diff as per the TVR spec sheet
at the time.
I could fit a 3.63 which would lower the revs at 60mph by about 200 (or do 65mph at the same noise level). Is it worth it? Don't think so...
A 5-speed gearbox might be a better option if it fits. They have a 5th gear overdrive ratio of 0.82:1, so 60mph would be just under 2,600 rpm, and
70mph would be just on 3,000 rpm - a bit quieter and with no loss of acceleration in lower gears.
With that in mind, here's the measurements of the 4-speed that's in the car (all measurements from the rear face of the engine block):
Length of bellhousing - 180mm
to rear of gearbox - 385mm (gearbox 205mm)
to rear of extension (back oil seal) - 765mm
to gear lever position - 740mm
Next chance I get, I'll measure the 5-speed in the S, and compare!
Then I'll have to look at different input shaft lengths, number of splines on input and output shafts, internal ratios (different for 1.6 / 2.0
engines than the bigger V6 engines), clutch compatibility, starter motor positions, and who knows what else - it's all helluva complicated!
Fortunately, I know a man who knows (or says he does), plus Burton Power do a very good guide (and some vary expensive parts).
At the end of the day, though, I'm not all that bothered, and I think I might just stick with the earplugs and a rebuild of the existing
differential!
 Here's one of the piston connecting rods. They have to be straight, but he suspects that this one might be bent beyond the acceptable tolerance
specification. I don't have any measuring equipment with me, but I suspect he might be right...


