Only 180 days left until the first TVR event of the 2024 season! Hurry, hurry! Get your bleedin' skates on!
Let's not panic Capt Mainwairing! There's plenty of time to sort out these minor niggles.
Some of us have major niggles though - Dave has 3 TVRs, all of which have been off the road this year since the flood at his house in January. Two
of them are ok but not in "show" condition - at least not for Dave. His Griffith has a broken engine and since he's still dealing with the flood,
he hasn't had time to figure out what to do about the engine...
Meanwhile back at the gitranch - I didn't go to the local TVR Car Club meeting at the weekend because Dave, Jim and Eric weren't going and I just
wasn't feeling like going on my own. So I didn't. I missed out on all the news of upcoming events that we will be attending as a Club. No wait, I
probably didn't... if I did it would be a first.
What I did do, was replace the fuel pump relay with a new one - they arrived on Monday so I swapped them over.
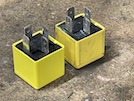 Here's the old and the new - shiny new terminals and no copper verdigris. Relay works, pump works, engine starts... sounds ok so far.
180 days left to test it out on the road - after the rain goes off (which may be on day 179 judging by the weather over the last couple of weeks).
I will need to find a dry day to swap it back with the Porsche - the exhaust is still leaking slightly so I'm going to fit a new bit - or rather
the 2-piece exhaust that I talked about last month. I've ordered the bits in plenty of time - if ony I had a real mate who doesn't come to Scotland on
holiday and can't be bothered saying hello to his pals...
So, I bet you're wondering - what happened with the Porsche exhaust repair huh? We need to know!
Well let's say, progress has been slower than expected. The new pipe arrived complete with clamps etc within a day or two... so you get all excited
like a toddler after Santa's been, and take it out of the box... to discover that, like Santa's stuff, there's a wee problem...
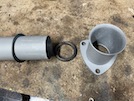 Here's the end of the longer pipe, the short connector that it fits into, and the seal and sealing washer...
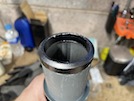 and here's the seal on the end of the pipe. The wee problem is that the seal is meant to fit OVER the pipe. A bit of measurement with a vernier (cos
I'm a proper engineer I am) shows that the outside diameter of the pipe is 50mm. The internal diameter of the seal is 41mm. The outside diameter of
the seal is 50mm...
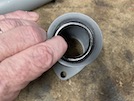 so the seal falls down inside the connector that it's meant to seal against. That's never going to fit and seal...
So I phone up the supplier, and they say that they're very sorry, it must be the wrong part so they'll send me another one.
2 days later it arrives and it's exactly the same as the first one... so I phone them again and after sending them photos and an explanation of how
it's meant to fit together, they admit that they have changed supplier and there has been a measurement mix-up so they'll send e another one.
That one arrives after another day, and it's the right one! Yay!
In the meantime, I've had various attempts at removing the old bit of exhaust. It's held on at each end by 3 M8 bolts through a flange with a gasket.
It bolts to the right hand heat exchanger, then to the exhaust on the left side, so it's kinda clamped between those as well, even with the bolts out.
The right side bolts are brand new, those are the ones that I hammeres, drilled and chiselled out last week.
The left hand nuts have rusted to completely round... there's nothing to get a grip of, but enough to hold the bolts firmly in place. I end up chiselling
sideways through each nut until I can unpick the remains from the bolt threads. Even then, the bolts won't shift... they are absolutely rusted solid.
I hammer them, chisel them, various applications of air hammer... I empty half a can of penetrant spray over them over the course of 3 days... not a
budge...
So that brings us to today... the day of reckoning!
You can't get leverage to get the left side of the exhaust apart, because the pipe is braced across to the right side. I figure that you need to shorten
it to give some wriggle room to disengage these bolts... so it's out with the air saw!
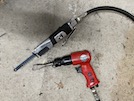 These are a fantastic bit of kit for cutting through things in tight spaces. Mine takes standard hacksaw blades, cut in half. They save a lot of effort,
they reach spaces that ordinary saws can't, and they make a nice noise, especially when the compressor kicks in.
They can also wreak havoc in a fraction of a second, so I am kitted out in the full safety gear - goggles, mask, safety gloves and wooly hat... no chances
taken here! This whirrs through the pipe in no time!
So with that out of the way, the other end should disengage easy, eh? Nope... it's still rusted solid. After battering it a few times with the air
chisel, there's a fraction of a gap opening up, and I manage to hammer a flat pinch bar between the two flanges, and open it up a little - but being
careful not to put too much force on the heat exchanger - if I break that, I'm in for £300 and infinite grief to get the old one out of the cylinder
head - 40 year old steel bolts in an alloy head do not promise easy extraction... I also need to be careful not to damage the exhaust flange that's
staying on the car.
Eventually I can get a thicker crowbar in, and lever a bit further, until it eventually comes out, after having to be forced most of the way...
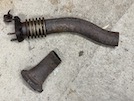 So here's the 2 bits of extracted exhaust. Those "studs" on the left hand side are actually through bolts that are rusted solidly in place...
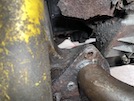 And here's the flange that they bolt into, shiny with a mixture of penetrant spray and perspiration.
I run a rat-tail file through the holes in the flange, just to clean out any remaining rust, and then (at long last) it's time for reassembly!
I don't have any photos of the reassembly process it occupied both hands, one knee and the top of my head. But basically, it involves fitting the sealing
ring and then the seal to the end of the new new pipe, and then threading that up from underneath, and sliding on the new short flange with a smear of
exhaust sealer. Fit the right-hand bolt loosely, then the left ones and tighten them up.
Then I push the seal into the flare, with the sealing ring behind, and fit the clamp.
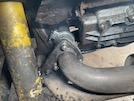 So it looks like this!
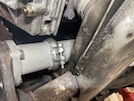 and this... this is the left side of the exhaust, with the cylinder head top left, and the heat exchanger on the right. Top centre, you can see one of
the studs holding the exchanger to the engine - effectively the exhaust manifold bolt - and you can see how rusty that is. You don't want to be touching
them unless you have to!
 and here's the right-hand end, where the leak was in the first place. All shiny and new!
So, the moment of truth - I start the car up and check for leaks before the exhaust gets too burny hot. And before I pass out from the fumes of burning
penetrant spray.
Jack car down from axle stands, and have a wee test run. Sorted!
There's something deeply satisfying about fixing things yourself - the sense of achievement last a long time. Not as long as the pain in your back and
shoulders and knees and hands, obviously, but still a fairly long time.
 Here's the old and the new - shiny new terminals and no copper verdigris. Relay works, pump works, engine starts... sounds ok so far.


