:: Diary - November 2022 ::
:: Sunday, 6 November, 2022 ::
It's TVR Car Club meeting today! I wonder what surprises await? I have a fair idea though...
Weather report:
It's pishing down.
We decide to go in one car, and leave the TVRs at home. We're going to the same place as last month - the one in Dunblane with fairly
limited parking - so that's another bonus.
There are only two TVRs there, both fairly local. Hugh has come down from from Perth (in his Vauxhall) so that's another bonus.
Although the parking is rubbish, the food and service are good and friendly.
:: Monday, 7 November, 2022 ::
I noticed that the driver's seat is getting a bit worn and cracked-looking, and that the colour seems to have taken a bit of a bashing.
So today, I pop along to the garage and take the seat out. The last time they were out (around 10 years ago) I put them back in with
stainless cap screws and lock nuts, so that I wouldn't have to reach a spanner on the top and another on the bottom at the same time.
It worked! 4 bolts off with a socket and ratchet takes less than 5 minutes - I didn't even have to jack it up!
Back to the garage at the house for cleaning and inspection!
:: Tuesday, 8 Novenber, 2022 ::
Task 1 is to split the back from the seat - 2 x M8 nuts on each side and an Allen key on the bolts through the frame.
 Here's the seat back - it's not too bad but a little worn.
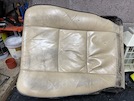 Here's the seat itself - a lot more worn, and cracks starting to re-appear.
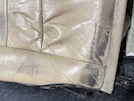 Note especially the manky strip at the back, which is normally under the backrest...
I'm going to be using a kit I bought from The Furniture Clinic. It includes all of the colourants, preps, pads and cloths you need to
re-finish the seats.
So the first step is to clean the seat back and sides, which aren't leather but vinyl. I use a cleaner first, and then an alcohol cleaner
provided as part of the colouring kit. Wear rubber gloves if you don't want magnolia hands.
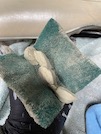 Then it's time to prepare the leather... the kit includes a a leather prep that takes off the old colour, if you're going to use a
different colour. I'm not, I'm keeping the colour so the prep stage is only to take off the worn colour and clean out those creases.
You get one of those Scotchpad things, fold it in half like a taco, fill it with 4 cotton wool balls, add the prep like a sauce, and
then rub the pad into the leather till you see the colour coming off.
This stage takes absolutely ages, and makes a hell of a mess. Don't be doing it on a carpeted floor while your other half is at the shops!
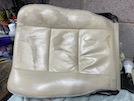 Here's the seat all prepared. Note the removal of more colour around the cracks - I'm going to use a binder to strengthen the leather, and then
a filler that should conceal those cracks. Those both need bare leather if they are to stick properly.
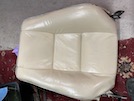 and here's the backrest. It's in much better nick, and doesn't need all the colour removed.
I give them both a wipe down with more leather prep on a cloth and then leave them to dry before the next stage.
The next stage is to rub the leather binder into the cracks - I don't have any though, so I order some, along with a wee tub of filler
for any of the larger cracks. Should be here tomorrow!
:: Wednesday, 9 November, 2022 ::
While I wait for the delivery, I mask off the metal bits of the seat frame and backrest, that I don't want to cover in colourant when I
get to that stage.
The parcel doesn't arrive unti; 7 pm though... The instructions say that you rub 4 coats of binder into the cracks, and then apply
another 4 coats lightly, and it has to dry between applications. This will take ages! I apply the first coat right away, and then
another at around 10pm.
Tomorrow's gonna be a bind!
:: Thursday, 10 November, 2022 ::
It's 10.30am. I applied another rubbed-in binder coat at around 7am, and I've just finished another - so that's the first 4 coats done...
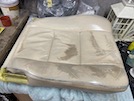 Update: it's now 10.30pm, and I have now applied 4 wipe-on coats with my trusty sponge. Most of the smaller cracks seem to now be fairly
smooth, so we can think about a wee smear of filler on the bigger cracks tomorrow.
:: Friday, 11 November, 2022 ::
The seat has been left out overnight to dry, so now it's time for a wee bit of filler! I bought a light flexible filler that's meant for
leather, it comes in a little tub and it's almost liquid. I spread it thinly over the cracks with a plastic spatula, and scrape off the
excess with the edge. It takes a fair while and a couple of goes, but eventually it seems to be a lot smoother.
Once it's dry, I give the filler a rub down with 1200 grit sandpaper, and get ready to do a bit of colouring. The first two coats are
dabbed on with a sponge, just to fill in the bare parts.
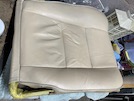 So now it looks like this! One or two of the cracks could do with another rub down and another skim of filler, but it's already a lot better
than it was!
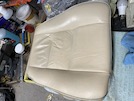 Here's another view from the front! Compare that to Monday, and it's a bloody good improvement. May as well see if I can get it better
while I'm at this stage though!
So the next steps will be another rub down of a couple of bits, and then re-fill and re-colour. Then it'll be time for the sealer coat(s).
:: Saturday, 12 November, 2022 ::
I have a few hours free today, so I start by giving the cracks in the seat base a wee rub down, an a couple of skims of filler.
Once that's dry, it's time to start spraying! I hane the seat base and the seat back upside down from the rafters in the garage, and give
them a wipe over with an alcohol cleaner. Then I set up the airbrush and my wee compressor. A few wee test sprays on bits of cardboard,
just to get the pattern and volume right, and we're off!
Steady light coats is the secret - just enough to cover the seat base first, then paint round the edge panels.
Leave that to dry, while I spray the seat back - first the leather seat face, and then the back and edges, which are vinyl.
I go round them both a few times, until the colour looks even, then after they have dried I take them down so that I can put the Porsche
back in the garage!
 Here's the seat back...
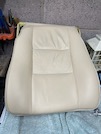 and the seat base.
That's the colour on, and looking good. I'm going to repaint the piping in blue before I seal it all. Small brush and steady hand required!
:: Monday, 14 November, 2022 ::
I had a change of heart yesterday. I was going to paint in the piping in blue, but when I looked at the seats this morning, I thought that
they look ok as they are. In order of preference:
1. Restored seats with nice blue piping;
2. Restored seats with no contrast piping;
3. Restored seats with shitty hand-painted piping (which is what I ended up with, the last time);
4. Leave the bloody seats in a mess.
Since I'm not taking the seats apart to stitch in new piping, option 2 is likely to end up looking best.
So... I haven't fully sprayed the piping (thinking I was going to overpaint it), so the first step for today is to set up more colourant in
the airbrush and spray in the piping more evenly - 3 light coats with a bit of hairdryer in between.
When that's properly dry, it's time to apply the clear sealer. First you have to mix in a hardener (at a ratio of 1 to 8) so I pour some
colourant into a bottle and add the hardener (it doesn't make the paint "hard" but it apparently improves its wear resistance). The
instructions say that you have to use the mix within 7 days, but I don't want to risk it going off in the bottle.
So I set out the seat base on a rotating stool, and start a painting frenzy with the clear sealer, airbrush in one hand, and hair dryer
in the other. When that's dry I put the seat back on the stool, face down, and do the back and sides the same way. Finally, today I give
the front of the seat back 4 light coats as well. It looks pretty good!
So I'll leave that to dry properly for a couple of days and then put the seat back together.
:: Friday, 18 November, 2022 ::
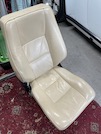 Here's the seat, all back together...
 It looks pretty good!
Now I need to put this seat back in the car, and take the passenger seat out for the same treatment!
:: Sunday, 20 November, 2022 ::
A wee trip along to the farm to swap seats. This should take around 10 minutes!
Erm... no! You see, the new owners of the farm have decided to re-open the caravan repair workshop, and better than that, they have decided to
re-employ Jock as their "man what fixes everything". He's a great guy, but a bit of a blether... not like me, no, not at all...
Anyway, he's just bought a Mk1 Escort with a 2 litre pinto engine, no bucket seats and no other interior trim. It's orange and it's lovely. So
naturally I spend some time looking at that, while he shows me the engine (now on the floor) and most of the mechanicals (ditto). He has a plan
to put a Ford Duratec engine in, etc etc...
Then his pal appears, so we go off on another tangent about Opel Mantas and stuff...
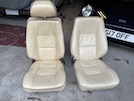 Anyway, about this car seat... I take out the passenger seat (on the left here) for a quick comparison. It's not too bad, but a bit grubby, and
the hand-painted blue piping hasn't worn well.
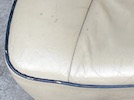 It's horrible!
Another 5 mintes to put the driver's seat back in the car, and I sneak away while Jock is still talking to his pal.
I'm not going to go through the restoration of this seat the same way - it will be exactly the ame as the first one, only left-handed!
 Here's the seat back - it's not too bad but a little worn.
 Here's the seat itself - a lot more worn, and cracks starting to re-appear.
 Note especially the manky strip at the back, which is normally under the backrest...
 Then it's time to prepare the leather... the kit includes a a leather prep that takes off the old colour, if you're going to use a
different colour. I'm not, I'm keeping the colour so the prep stage is only to take off the worn colour and clean out those creases.
You get one of those Scotchpad things, fold it in half like a taco, fill it with 4 cotton wool balls, add the prep like a sauce, and
then rub the pad into the leather till you see the colour coming off.
 Here's the seat all prepared. Note the removal of more colour around the cracks - I'm going to use a binder to strengthen the leather, and then
a filler that should conceal those cracks. Those both need bare leather if they are to stick properly.
 and here's the backrest. It's in much better nick, and doesn't need all the colour removed.


