:: Diary - March 2011 ::
:: Friday, March 4, 2011 ::
I finally managed to get along to the farm to put the back wheels on to the S, which doesn't take long.
While I'm there, I notice another car under a cover in the big security barn (where mine was when I first went there, before I got my own shed to work
in). It's a nice tailored cover too, with wee pockets for the mirrors and everything - not like the two cotton sheets I throw over mine.
Looking underneath the cover, I can see 2 minilite-style wheels with chrome rings, and I deduce from that, and the general shape, that it's an MGB.
The farm owner tells me that it is an MGB - a chrome bumper model, which the owner has converted to fit rubber bumpers. Now I've heard of loads of
owners converting rubber ones to chrome bumpers and grill, but I've never heard of anybody converting the opposite way. Still, it takes all sorts I
suppose.
But why?
Then I go home to try to diagnose the cause of a suspension clonk from the daughter's Fiesta. I looked at it last week, and the exhaust was banging
off the spring, so I tightened up the exhaust mounting (by horsing a big jubilee clip round it). She says it's still doing it though, but different.
Expert diagnostics eh?
After a drive and a rummage, I find that the spare wheel and jack aren't fixed down in the boot properly. 5 minutes later they are, and a test drive
shows that the suspension clonk has gone.
As if by magic!
:: Sunday, March 6, 2011 ::
It's TVR Car Club day! And I've got a choice of two cars - they're both working! After faffing about trying to decide, I run out of time to go along
to the farm to get the S, so I decide to take the Cerbera. Drop by to pick up Dave, then a nice leisurely drive without those other bad boys and their
bad influences...
When we get there, there's a group of amateur photographers who have come to see all the lovely cars. Unfortunately, because the Celtic Gathering is
also on this weekend, there are only two TVRs there... although Jim turns up later, they've gone by then. (the words "Jim" and "turns up early" do
not belong in the same sentence. Ever.
Nobody seems to have told the hotel either, so there's 7 of us and 4 waiting staff.
On the way back, I notice that the steering feels a little bit vague, but not loose. I'm wondering if I need to adjust the settings on the shocks a
tiny bit, to account for better grip from the new tyres.
When I get home and put the car in the garage, I notice a few drips of oil where it was standing while I opened the garage door. I quick peek underneath
suggests it's coming from just in front of the engine, on the offside. The engine's dry though so it must be something else. I'll have a look tomorrow.
:: Monday, March 7, 2011 ::
Bollocks! Not to mention other rude words like pee, po, belly, bum and drawers. I'm a plonker.
I decide to have a look for that oil leak on the Cerb. First I remove the air intake ducts and the panel in front of the engine, and have a look. The
engine is dry, the oil is dripping off the plate underneath. The steeering rack (not the rack, the pinion housing) is oily though. I take off the power
steering reservoir cap and it's below the minimum. This could maybe account for the slightly vague steering feel yesterday, if the power steering was
"intermittent"!
OK, so I don't want to get the garage floor manky while I clean that off, so I move the car out of the garage and give it a spray with some degreaser,
then a scrub with a stiff brush, before washing it all off. Nice and clean! I also top up the reservoir to the "max" mark - I'll need to keep an eye on
that and see how fast it goes down.
However, relieved, that I don't have to shell out a fortune on fixing an engine oil leak, I go to reverse the car back in the garage. At which point,
just in the last foot of travel, I manage to scrape the drivers side front wheelarch against the garage door post.
That's what you get for being too bloody lazy to walk back into the garage to put your glasses back on, because you took them off so they wouldn't get
all sprayed with degreaser. You can't judge the distance to the front of the car properly!
It's not a massive area of damage, but it's bad enough - it's scraped through the paint to the fibreglass. I don't really want to get the front of the
car resprayed (it's gonna be a bastard to match the colour, for a start) although it could really do with it, to be honest, because it's covered in
stone chips, and it's a bloody mess. I'll take it along to my favourite body shop and see what they say.
Ah well, into every life a little breeze block must fall...
:: Saturday, March 12, 2011 ::
I've been trying to get the Cerbera into a bodyshop to get advice on fixing the front wing.
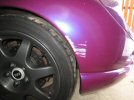 Here's the damage, which is very localised, but with the paint being pearl, it'll probably need half the car repainted (or maybe all of it...) to get
a decent match. Anyway, the week has turned out to be fairly busy, so today is my first chance.
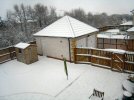 Only problem is, we get up this morning to this. More snow. I've just realised that garage looks tiny in that photo - it's actually 6 metres square.
Either that or it's a Tardis - it seems to have more room inside. Not qute enough though, especially at the doors, as it turns out...
So that car is staying where it is and won't be visiting any body shops today. I'll try to get something organised for Tuesday (Monday is already a
busy day for me).
So instead I decide to look at the boot switch. The last couple of times I've been out, the boot has been difficult to open - you press the button
loads of times before anything happens. It could be that the badge isn't depressing the switch enough, or it could be the switch itself, or the wiring,
or the boot release solenoid. Now I replaced the solenoid last year, so it's unlikely to be that, but we'll check.
So - first job is to pull back the carpet behind the switch, and remove the boot badge. That lets me try the switch direct - and it only works
intermittently. So the badge isn't the problem. I can't really get to the switch terminals through the aperture in the boot (they are all taped up)
so I disconnect the switch wiring, and use a little offcut of wire on the car side of the connection, to short out the terminals - and each touch
works the solenoid, without fail. So the problem is on the switch side of that connection.
I remove the switch from the panel, and strip back some of the insulation so that I can reach the terminals. Connect up the wiring in the boot, and
then bridge the switch terminals with my bit of wire - and again it works perfectly. So the evidence points to the switch itself. I disconnect the
wiring again, and connect a meter across the switch terminals. It's dead. I need a new switch.
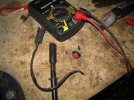 So I clip the wiring off the back of the switch (you have to - the wiring connector doesn't fit through the hole in the boot!) and remove it. I need
a new switch, and it looks like a fairly standard panel switch, so it looks like another visit to Maplins. Not in the snow though.
If only all jobs were as easy as this...
:: Tuesday, March 15, 2011 ::
The plan was to take the Cerbera up to a bodyshop to see about a repair cost - unfortunately it's bucketing rain so I don't bother. In any case, I
need to fix the boot switch first - at the moment it hasn't got one!
I bought a new switch from Maplins on Sunday. It's not exactly the same, but it'll do the job (you can't see it when it's installed anyway). I start
by trial-fitting it with a meter on the terminals, to make sure that the normal means of operation will work. And it does.
Right. Remove the switch so that I can solder the wires on to the terminals. The problem I had was that the wiring had been soldered straight to the
switch, and the connector doesn't fit through the hole, so you have to cut the wires or de-solder the terminals to take the switch out. So I decide
to fit a couple of short bits of wire to the switch, with push-on bullet terminals, and add mating terminals to the vehicle wiring, so that the thing
can come apart again without a soldering iron.
So I solder two bits of wire to the switch, and then put separate bits of heat shrink over each terminal, then a wider bit over both wires, before
shrinking it in place with a hairdryer (which I have to borrow, seeing as I don't have much use for one normally). Then put the bullet connectors in
place, put the switch in place, slip the switch securing nut over the wiring, and fix it in place and connect it up. Check again that it works the
boot solenoid. Fine!
Then screw the badge in place, tightening it up till it just works the solenoid, then slackening it up slightly, then adjusting it so that it's sitting
at the same height on each side. Check again - it works perfectly!
If I was able to avoid garage door pillars, I'd be a genius.
:: Wednesday, March 16, 2011 ::
I'm just back from the bodyshop, who have given me an estimate to fix the garage door scrape. All I can say is that it's cheaper than rebuilding the front of
a different TVR after smacking it into my own Saab...
I haven't made up my mind whether to keep the Cerbera or sell it. On the one hand it's a brilliant car, but the downside is that I don't really have the time
(or to be honest, the inclination) to keep on top of the maintenance and gradual improvement of 2 cars - and the S deserves a bit more attention. But I don't
know...
However, if I sell the Cerbera as it is, I'll lose more than the cost of the repair, so I'm going to get that scrape fixed, it doesn't really affect whether
I decide to sell it or keep it.
So I've booked it in for next Wednesday, and hopefully that'll be that sorted.
When I get home, I put it back in the garage. Very carefully, and with my specs on...
:: Saturday, March 19, 2011 ::
Spring is sprung, the grass is riz, I wonder where the Cerb's keyfob is? I'm going for a little run, cos it's months since we last saw the sun.
I decide to have a wee run out in the Cerbera, just because it's sunny. Just 80 miles or so, nothing extravagant.
The car is running beautifully, sweet as a nut. The handling feels a alittle strange occasionally though, and I remember that I adjusted the tyre pressures to
those in the handbook a few weeks ago. I think I might pump them back up by a couple of psi to what they were before, and see if that makes a difference.
I should have washed it first though - it's manky. I wash it when I get home, then I spend ages looking up the service record for last year (it's not done
3,000 miles since then) to check what other points they advised on. Main thing was that the rear brake disks were starting to corrode (the MOT tester pointed
that out as well, but said it wasn't quite at the "advisory" stage) and that I need new handbrake shoes.
A quick check shows that a pair of disks, a set of pads, handbrake shoes and a handbrake cable cost £640 from a TVR dealer.
Can't do much about the disks, they are TVR specials, and are £190 each, but I find that I can save more than £100 if I buy Peugeot 605 handbrake shoes,
and redstuff brake pads.
I also look up how to change the oil and filter myself - a bit of prior dismantling required, but otherwise, nothing special.
Don't have to do either of those jobs just yet, but best to be prepared eh?
:: Monday, March 21, 2011 ::
I think I have sussed out the cause of the slightly dodgy handling in the Cerb. I remember checking all the tyre pressures, and setting them to the "book"
pressures of 22 front / 24 rear.
But since then, I got new back tyres... and he asked what pressure to inflate them to and I said 24... I even watched him set them to 24 on his gauge...
But what I didn't do, was check those pressures with my own gauge, I've got 4 - an electronic digital one, a dial gauge, and two of those sliding bar ones, one
of which is older than me, it's from the tool kit of a 1951 Rover. I realise that the "dodgy handling" issue seems to have arisen after I got the new tyres - I
hadn't mentioned it here before.
So I check the pressures, and they're both 19 (whichever gauge I use). The garage's gauge was reading bollocks. Since buying the tyres, I've read that some
people run higher pressures than the handbook says, so I set the back tyres to 26, and the fronts to 24, and we'll see how that feels.
Schoolboy error no 1 : don't trust anybody else's stuff, when you don't know how they treat it...
:: Wednesday, March 23, 2011 ::
Took the Cerbera along to the body shop for the front wing repair. It's not very far (6 miles or so) but going round a couple of roundabouts suggest that the
car's handling is a lot better. Let's not go counting chickens just yet though...
They say that it'll be ready by Friday, which I didn't expect. They also say that they can't give me a lift along the road to the other garage to pick up the
Lexus (which they said they would). But it's a nice day, I'm not in a hurry, so I walk it.
Schoolboy error no 2 : don't trust anybody else to do what they said they were going to do...
:: Saturday, March 26, 2011 ::
The Cerbera is ready for collection! I go along first thing, and they say they've kept it in the workshop ovenight, rather than out in the compound. I watch as
he goes to get it, then brings it back throught the bodyshop - and even although it's my own car, and I've seen it loads of times before, I'm still amazed at
how good it looks. I'm a lucky lucky bastard.
The repair is excellent - absolutely undetecectable. Bill paid, and I go for a little run, just for a few miles - I've got to be home in an hour or so because
somebody is coming to look round my old house, that I'm still trying to sell. It's a fantastic car this - just superlatively good...
After the house viewing, I go back up the road and put the Cerb in the garage, and decide to paint the brake calipers, which were painted purple (a very dark
purple that looks more like brown - ie bloody horrible). I decide not to be too fancy, but to paint them with aluminium heat-resistant paint that I bought ages
ago for the S (I used it on the corroded coolant pipes). They look damn good! Might pick out the details tomorrow, in black...
Schoolboy error no 3 : don't tart up a car you're supposed to be thinking about selling...
:: Sunday, March 27, 2011 ::
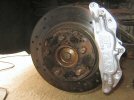 Here's one of the front calipers, now that the aluminium paint has dried - it looks pretty fab! I started to paint in the detail in black, but decided that I
don't like it, it just looks too fussy - so I wipe off most of the black, and I'll paint over that little bit in silver once the black has dried..
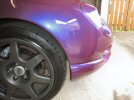 And here's a photo of the repaired front wing. Yes I know it's in the garage, but the angle of the light shows off the paint's colour change better than being
outside, and it still looks perfect.
 Here's the damage, which is very localised, but with the paint being pearl, it'll probably need half the car repainted (or maybe all of it...) to get
a decent match. Anyway, the week has turned out to be fairly busy, so today is my first chance.
 Only problem is, we get up this morning to this. More snow. I've just realised that garage looks tiny in that photo - it's actually 6 metres square.
Either that or it's a Tardis - it seems to have more room inside. Not qute enough though, especially at the doors, as it turns out...
 So I clip the wiring off the back of the switch (you have to - the wiring connector doesn't fit through the hole in the boot!) and remove it. I need
a new switch, and it looks like a fairly standard panel switch, so it looks like another visit to Maplins. Not in the snow though.

