:: Diary - June 2014 ::
:: Monday, June 2, 2014 ::
Sometimes this website can be a pain in the bum - I’ve thought several times about giving it up, because I’m worried that it’s getting a bit boring. Then
I look at some of the bollocks people write on forums, so there’s obviously a market for it.
We’ve received thousands of fan mail letters this week (well, one) from a man in Luxembourg who has just bought a car here in the UK, and was looking for
advice on changing it to “dip-to-the-right” headlights, and other things. A few words, a few photos and he’s a happy pixie. He’s going to collect his car
and drive it home, in convoy with his mate.
Anyway, with my bit done for european relations, I decide that I should really think about getting my own car back together so that it can reach the other
end of the street.
Priority one - steering is always a good accessory on any car. Going in straight lines died out with the Romans. So I take my refurbished steering rack,
and turn it through its full movement in both directions, so that I can set it to dead centre and mark the pinion. Then I fit it back into the chassis,
feeding it through from the driver side, and fitting and bolting down the clamps. Check that it’s still central, set the steering wheel to straight ahead,
and refit the bottom UJ to the pinion and the top one to the steering column.
I counted the turns when I took the balljoints off - 8 on the right, 10 on the left. I decide to start from 9 turns each side. First I put the lock nuts
on and then the balljoints, and fit the joint tapers into the hubs and bolt them up. That results in both hubs being turned slightly to the right when
the steering wheel is central. The rack is at its central position as well.
What to do? Do I straighten up the wheels so that the rack is off-centre when going straight ahead? Or do I adjust the steering arms to turn the
steering wheel so that straight-ahead fits with the centre of the rack movement? The second one seems more sensible…
Before I take the car down off the stands, though, I refit the radiator, and refill and bleed it. Then I start the engine and let it run while I let the
car down, and put my stuff away.
I drive up the street and back to settle the suspension, then set the toe-in. No I don’t have a fancy tracker gauge - a bit of string is tied to the
roll bar, around the back of the wheel and then forwards to about 10 feet in front of the car where it’s tied to a big heavy axle stand. The stand is
moved till the string just touches the front of the tyre.
Then the same on the other side. It’s pretty obvious now that both front wheels point right, so I shorten the right hand steering arm by a couple of
turns, and lengthen the left one by the same amount. I roll the car forward a few feet and back again, and set up the strings again. A quick measurement
shows that (a) they both line up with the edge of the rear wheels and (b) there is now no toe-in - both wheels are parallel. I tweak each steering rod
in a touch, tighten the locknuts and check again - a slight toe-in. Perfect. It’s science and maffs and stuff, innit?
A quick test drive suggests all is ok, there’s no evidence of bump steer, so I drop by the garage and book another MOT test for Thursday. Here’s hoping!
:: Thursday, June 5, 2014 ::
MOT passed - yay!
On the way back, I have a wee drive and decide that the car is going better than it has for ages, it’s absolutely brilliant and I wonder why I don’t use
it more - Yay!
Then the passenger side window goes down but not up (which is a great discovery in the middle of the monsoon we had this morning) - Boo!
And there’s a loud noise which I thought was the fuel pump, but isn’t - Boo!
So there’s another couple of wee jobs to while way the hours when I have nothing better to do - yay - er I mean, boo!
And I also bought another vice, to replace the one that fell apart last month, after only 20 years. This one is much bigger and swivels on its base like
a Dalek with a castor stuck in a tram line. Unfortunately, it also needs bigger bolts to hold it down. And it needs 4 instead of the 2 the old one had.
I manage to find 2 bolts the right size (the pivot bolts out of the old bonnet hinges, if you must know - I am half-git half-womble so never throw
anything away) but I pop down to B&Q for another 2.
Have you ever tried to buy bolts, screws or other similar stuff from B&Q? If not, let me explain. They have a wall of little boxes, each labelled with
a different item. All the boxes for set screws are together. All the boxes for nuts are together. All the boxes for self-tapping screws are together. Ad
infinitum. There’s also a handy reference chart along each shelf, showing the sizes they supposedly stock.
However, what’s actually in the little boxes bears little resemblance to what the feckin label says - so you have to start at one end and look in each
box to see if it has the item you want. After a thorough search and a break for tea and sandwiches, I have found 2 bolts the same, that will do the job.
So it’s on to the till. Except that there are no till operators, you have to use the “self-service” thingy, which is fine if the item is big enough to
have a label you can scan, but not for individual bolts etc. I start the purchase procedure: “Loose Items” - press; “Select category” - categories
include kitchen stuff, decorating stuff, etc etc but nothing that looks remotely like “stuff that holds stuff together”. While I am trying to solve this,
feeling like a contestant confronted with a cryptic clue on “3-2-1” (remember that? Anybody who could solve those clues should have been locked away),
the supervisor, displaying the quick reactions of a fossilised sloth, appears beside me. “Everything all right there?”
“Well no, I’m trying to pay for these…”
“Ah see, what you have to do is.. em.. what is it again? Em.. hang on, they’re in here somewhere…” I think this must be the same person that sorts out
the bolts randomly into their little boxes by spraying them from the other side of the store.
I hear a snapping noise. It’s Victor Meldrew’s patience. I’m off. No bolts. No vice fixing today.
:: Thursday, June 5, 2014 (Part 2)::
I found another couple of bolts in the garage so the vice is now fixed down.
The main update, though, is that I have a look at the passenger window that goes down but not up. I look at it for 30 minutes but it still won’t go up.
I’ll never be Uri Geller. The Force is fecked in this one.
So I decide, instead, to try to diagnose what’s wrong with it without using psychic powers.
First I pull the switch out of the console and check that no wires have dropped off. Seems ok. It must be getting power because the window goes up,
dunnit? The difference between “up” and “down” is just that the power is switched through the motor the other way round.
I decide to check the motor. First I have to remove the door card. I’ve covered that before, but in brief, the order is - remove speaker, put hand in
and remove tiny nut from the back of the armrest (unless you’ve put an M5 wing nut on it in the past), unscrew the screw at the back of the door, pull
the plastic spring clips along the bottom edge of the trim out of the door, and unhook the door lock cable from the lock. Trim off.
I reach inside the bottom of the door, and find the wiring to the window motor. There’s a Ford-style 2-pin connector about 1/2 way along the door. I
take that apart and plug in a voltmeter. It reads 12.8 volts when I press the “window up” and minus 12.8 volts when I press “window down”. So the switch
and wiring is ok. It must be the motor. Fantastic.
How the bleeding hell do you get the motor out? An internet search turns up no advice whatsoever. It’s about time somebody started a decent website
telling you how to do all this stuff.
I don’t want to start taking the door to bits and taking the window and the whole mechanism out - if I can get the window shut I’ll leave it like that!
Let’s start by undoing the 3 bolts that hold the motor to the door and see where that takes us…
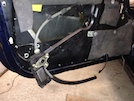 With the nuts removed, I can push the motor into the door, and then with a bit of gentle wiggling, I can just, and only just, extract the motor
and the cable drive mechanism from the door.
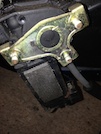 Now I can see that there’s another electrical connector at the motor itself. I disconnect that, and test it again - 12.8 volts with switch at “up”,
minus 12.8 volts with switch at “down”. So the wiring seems ok. Must be the motor…
How does the motor come off the drive? After changing my specs, finding a light and squinting for ages, I find that there are a series of wee “tangs”
holding it in. By holding the motor in one hand, and six screwdrivers at the same time in the other hand, I manage to bend back the tangs and release
the motor!
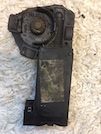 Here’s the motor. Before I chuck it away, I need to do one more test. I find 2 bits of wire with spade terminals on the end, which I connect to the
motor terminals. Then I hold the other end of both wires against the car battery. The spindle turns…
Then I swap the wires over, and the spindle turns the other way. Hang on, this motor’s working fine.
Back to the door. I connect up the car wiring. The motor spins “down” but not “up”. I disconnect the motor from the car, and then use my bits of wire
to replace the last foot of wiring (by connecting straight to the white Ford connector). The motor spins up and down, no problem…
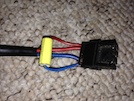 Somehow, this connector reads ok with a meter, and works in one direction, but doesn’t actually provide power to reverse the motor. Very mysterious…
Before I put it together again, I clean and lubricate the motor gears and also the cable drive. Then the motor just press-snaps back into the spindle
drive. I connect it up with my bits of wire - window goes up and down. I use the car’s proper connector, and it works a couple of times, then stops…
I’m going to leave it all overnight and try it again tomorrow, before I put everything back together.
In the meantime, just in case, I do a bit of research on finding a replacement if I need one. TVR shops sell them, apparently, for £100 or so.
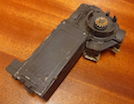 I find this second-hand part on ebay, for £20. Apart from the fact that it’s for the other door and therefore a “mirror image”, does that look like it’s
gonna fit or what? I’m not going to say what car that’s off, until I decide if I need one (there is precedent for me finding a suitable replacement
part, and putting it on here, and then finding that the world’s stock disappeared before I could buy one). At least I have an option!
:: Saturday, June 7, 2014 (Part 2)::
Now I’m completely befuddled! (what’s that you say? As normal? Go to the back of the class.)
I go out to the car and try the window. It goes down… and up… then down… then up… it seems to be ok. So I decide to put it all back together. I disconnect
the wiring and wiggle the motor and the drive mechanism back inside the door, and refit the 3 bolts that hold it on. Then I reconnect the wiring and try
it again… and it goes down… and up… then down… then up… then down… then nothing… not a flicker.
Try the meter again… plus 12 volts with switch at ”up”, minus 12 volts with switch at “down. So why is the window not working?
In a flash of inspiration, I pull the switch out of the console and sway the two end wires over. Now it goes up with switch at “down”, but nothing with
switch at “up”. Swap wires back - now it won’t go up. Despite the voltage readings, it’s the feckin switch!
I take the switch off, and blast it full of contact cleaner, and refit it. Now the window goes up and down ok… bastard bleeding TVRs - built to defy human
logic! I leave it wired upside-down though, on the basis that I don’t mind if it opens or not, but if it does open, I always want to be able to shut it!
So I put back the door trim 3 times. 3 times? Yes, I manage to put it all together, then realise that I forgot to connect the door lock cable, so have
to take it apart again. Second attempt - when I’m finished, I find a wee wing nut… Speaker back off, fit wing nut, speaker back on.
As a precaution, I order new switches - they are Land Rover Discovery and Range Rover rear window switches. Not a lot of people know that - and if they
did, they didn’t tell me.
:: Monday, June 16, 2014 ::
Still no sign of the new window switches. The window seems to be fine now though, electrical contact cleaner is magic stuff!
A small group of us have planned a wee trip up north next weekend, so I want to get the car sorted out by Friday. I’ve decided that I’m going to change
the oil before we go though, so today I nip up to the motor factors and buy a filter and some Mobil 2000 oil - it’s a 10/40 semi-synthetic at a reasonable
price.
:: Tuesday, June 17, 2014 ::
Adrian’s coming on our trip on Saturday. He’s driving up here on Friday. His car’s off the road though, but it’s getting a new MOT today.
Except it failed. Still plenty time to get it sorted though…
Meanwhile, at the risk of knackering the car at the last minute, I decide to change the oil. I jack the car up, put a drain tray under, and take out the
sump plug. Then I take the old filter off and screw the new one in. Replace the sump plug (don’t miss that bit) then refill with oil, take the tray out,
let the jack down and check the oil level. There….
I spend the rest of the afternoon polishing wheels, dressing tyres, cleaning and hoovering the interior, and softening the rear dampers by a couple of
clicks. I’ve only got the bodywork to clean, and I’m ready. I think.
:: Friday, June 20, 2014 ::
After a frantic day trying to tidy up various bits of work (after being off yesterday for my daughter’s graduation), I manage to find time to clean the
car’s bodywork. It’s looking good!
Adrian calls later with a trail of slavering pish about his car breaking down on the way up, and getting towed to Dave’s top be repaired. Turns out he’s
winding me up. And to be fair, he’s the only person who I could have believed would be that daft. Never mind eh? Even if I see his car explode into a
million bits in front of my own eyes, I still won’t believe him.
:: Monday, June 23, 2014 ::
Well, that’s me just home from the S-Series owners’ trip up north. 10 people, 9 cars, 3 days of driving, 750 miles or so, no breakdowns. Who says TVRs are
unreliable? The owners, maybe, but the cars bore up well!
For the first time, the S Series were in the minority - mine, Hugh’s and George’s V6 models, and Jim’s newly-acquired V8S, which is a beauty. We’re
accompanied by Dave in his gas-guzzling (even by TVR standards) 350 FHC wedge, Calum’s 350i which has been stripped and track-prepared. 3 Chimaeras, courtesy
of John, Adrian and Ollie, make up the party, in case we need to carry golf clubs at any point.
I’m not going to give a minute-by-minute account (you’ll be glad to hear) because the weekend was too full. On Saturday we drove up the east coast through
Fife, Dundee, then Arbroath and Montrose to our lunch and refuelling (for some) stop at Banchory,
Then Dave takes the lead as we head over the hills towards Elgin, following Dave’s printed route. Until we’re not, we’re off course. “Fuck it” we all
say, and head on towards the unknown. “To infinity (or Tomintoul, which is much the same thing) and beyond!” The Cockbridge to Tomintoul road is the
first road to close because of snow in winter (and sometimes even in summer) and the last to re-open. Apart from the fact that it’s high, it also has
really steep gradients and hairpin bends. It’s brilliant in a TVR in the summer though! We catch up to a doughnut in a Vauxhall who seems to think that
if he canes the shit out of his car on the downhill bits, he’ll be able to coast up the next hill without using fuel. This means that he arrives at the
top of every crest and at every bend at about 1 mph, then gets up to 70 on the next downhill straight bit.
And so we reach the A9 for the last 20 miles to the hotel. I have already agreed that I will go back to the front because I know where the hotel is from
this direction, so I blatter past from about half-way back on a dual carriageway section, and then lead the convoy straight into a housing estate. I
turned off a junction too early. I’m a tit. All eventually safely delivered to the right place though, no harm done.
On Sunday, the weather forecastrain, followed by showers. So it’ll be roof-on motoring then. No, that would be too sensible, we’ll put the roofs on when we
have to. So after a hearty breakfast, and nipping round to the garage for more fuel, we are off across the Kessock Bridge to the Black Isle, and then on past
Strathpeffer towards UUllapool, and then down the west coast past Poolewe to Lochcarron, where we stop for lunch.
Then our route takes us south towards Dornie, past Eilean Donaan and through Glen Garry to Spean Bridge, where we park up at the Commando Memorial to say
cheerio to John, who has to be back on Monday to get ready for a trip to Manchester. Then it’s just a short drive to our overnight stop at Fort William in the
shadow of Ben Nevis.
Monday dawns with another hearty breakfast, and the prospect of better weather, so the roof can be packed in the boot, before we’re off southwards through
Oban and then over the hills through Kilmelford (where unfortunately there is no sign of a coffee morning with delicious helpings of cake, like we had last
year). Then we turn onto a wee road along the south side of Loch Awe. It’s single track, it’s hilly and twisty and progress is slow - but that’s all part of
the fun, you can’t batter about everywhere. Unfortunately, these low speeds mean that your attention (well, mine at least) tends to wander from the task of
driving, and I come over one wee crest to find that everybody has stopped to let somebody come the other way. I stop in time, but only by making a lot of tyre
noise which sounds more dramatic than it really is. It wakes me up though! Who says speed kills? It’s driving slowly that bores you off your tits.
Then it’s on to the “Green Welly Shop” at Tyndrum for lunch, before we head on up Loch Earn to Crieff, where we say cheerio to Hugh, before turning south to
Yetts ‘o Muckhart (I want to live there just so that I can spell it every time I order stuff from England) and on through Glendevon to Kinross, and then the
motorway over the Forth Road Bridge to home.
I’ve really enjoyed my wee car, it’s running like a sweetie and sounds just brilliant. Why do I not use it more often? The driver’s window has gone a bit wonky
though - it goes down, but sometimes won’t go up (it’s obviously jealous of the attention that I gave to the passenger side window last week - that’s now
working perfectly).
Well the new window switches that I order, arrived on Saturday, one day too late to be any use. I decide to fit them but find that they are pattern parts and
are 1mm too wide to fit in the original slots. I don’t want to start cutting the holes in the console bigger, so I rub down the sides of the switch on a bit
of sandpaper flat on the bench, until they fit. The first one works, but it feels really cheap. Then the rocker bit breaks off. Three presses, and it’s
knackered. I don’t even bother trying to fit the other one - these are cheap chinese copies, and aren’t even worth the cost of the postage, if you got them
for nothing.
I blast my original switch full of electrical contact cleaner and click it a few times, and wave it about a bit in a scientifically-proven method to dry it
out, then refit it. It now works perfectly.
I’m going to add some photos, and hopefully video, of the weekend when I get more time - if anybody has photos to include, then send them to me - I didn’t
take that many.
 With the nuts removed, I can push the motor into the door, and then with a bit of gentle wiggling, I can just, and only just, extract the motor
and the cable drive mechanism from the door.
 Now I can see that there’s another electrical connector at the motor itself. I disconnect that, and test it again - 12.8 volts with switch at “up”,
minus 12.8 volts with switch at “down”. So the wiring seems ok. Must be the motor…
 Here’s the motor. Before I chuck it away, I need to do one more test. I find 2 bits of wire with spade terminals on the end, which I connect to the
motor terminals. Then I hold the other end of both wires against the car battery. The spindle turns…
 Somehow, this connector reads ok with a meter, and works in one direction, but doesn’t actually provide power to reverse the motor. Very mysterious…
 I find this second-hand part on ebay, for £20. Apart from the fact that it’s for the other door and therefore a “mirror image”, does that look like it’s
gonna fit or what? I’m not going to say what car that’s off, until I decide if I need one (there is precedent for me finding a suitable replacement
part, and putting it on here, and then finding that the world’s stock disappeared before I could buy one). At least I have an option!