:: Diary - January 2010 ::
:: Friday, January 1, 2010 ::
Still haven't been out to fettle the Cerbera's suspension. Not a lot of point, I can't drive far anyway!

 I parked the Lexus outside the garage on 18 December, when the snow first came on. It hasn't moved since (although I did, somewhat optimistically, clear the
snow off it but didn't go anywhere before it snowed again). The Fiesta is Miss Git's, and that's been out twice in that time (with me driving it...)
It has snowed every day except 2, since then, and has hardly been above freezing point either. I can't remember a prolonged spell of weather like this since
I was very young, and that's a very long time! Because we now live at the top of a hill, getting the car out is relatively easily. Getting it back, isn't.
I can't even get to the farm where the S is, and it's too cold in the garage for Cerb-fettling (apart from anything else, the cold makes things more brittle
so they break more easily - that's what I tell myself).
I've filled in my spare time by eating, writing articles for Sprint magazine, and surfing adverts for Land Rovers...
:: Sunday, January 10, 2010 ::
It's car club meeting day today. And there's still a lot of snow on the ground, so I decide that it's a good day not to take a TVR. We meet up at Dave's
and travel through in his car.
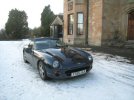
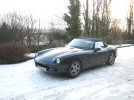 Only Adrian has been brave enough (or daft enough) to come in his TVR so he gets the car park to himself. We are not worthy.
:: Sunday, January 17, 2010 ::
Well, the snow has finally melted yesterday. and the temperature sits at a balmy 7 degrees. Pausing only to put on some sun cream and my shorts, I decide
that it's time I finished the Cerb's rear suspension - I have to adjust the camber of the nearside rear wheel (it has too much) and also I am going to try
stiffening up the rear shocks.
First, off with the nearside rear wheel, then loosen the top bolt through the hub carrier. Pull the hub out a tiny bit and retighten.
Then I turn the damper 4 clicks harder, and replace the wheel.
Nip round the other side and reach underneath and adjust the offside damper 4 clicks harder.
Right. Next job is to replace the front shock absorbers. I jack the car up and take off one wheel, but realise that I have to take the drop link off the
rear of the bottom wishbone, and the drag link off the front, to get to the lower bolts. If I'm going to do that, I'd be as well to change the brake disk
at the same time, so I decide I'd rather check to see how the car feels with the adjustments I've already made to the rear. Any excuse for a run!
First I have to stop for petrol and that's when I realise that I still have my old car-fixing clothes on - a fine sight I look, in a swanky car with the
arse hanging out of my trousers.
The car feels great - this is my first TVR drive for over a month and I needed a fix!
:: Wednesday, January 20, 2010 ::
Finally got a chance to replace the Cerbera's front suspension. Took me a couple of hours, the first side took an hour and a half, the second side took
half an hour after I'd worked it out. I'll know next time! I did the offside first then the nearside, but didn't take any phots of the first one so all
the photos are the nearside.
First job is to kack the front of the car up, support on axle stands, and take both front wheels off. You need the weight off both front wheels as I'll
explain in a minute. Then spray all the bolts you have to remove with copious amounts of penetrating fluid.
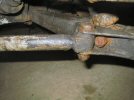 First thing to note is that the bottom damper bolt goes through the wishbone from the back, and the nut is partly covered by the end of the drag link that
gives fore-aft location of the lower wishbone.
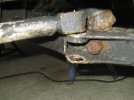 So the link has to be disconnected at the wishbone end. Loosen the bolt, and knock it out from underneath, noting where all the washers go. Then you can
(just) lever the link end out of the lugs.
Then I though that all I had to do was loosen the lower suspension nut, and knock the bolt out backwards. Unfortunately, it hit the drop link ball on the
end of the anti-roll bar, so that would have to come off first. This turned out to be a right pain - the bolt holding the lower drop link joint on, goes
through the anti-roll bar, and by a combination of rust and (I think) previous overtightening, it just wasn't for moving. I can't get a socket on because
the wishbone is in the way so leverage is limited to the length of a ring spanner. My feeble wee arms wouldn't move it!
So I had to resort to the trusty blowlamp to heat the nut up, from above and below, and trying not to breathe in penetrating oil smoke. I've rarely had
success with heating nuts, but this time, it worked! Off it came, allowing me to knock the lower bolt out, again noting where all the washers go.
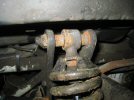 Then remove the top damper bolt, being especially careful to collect the two loose spacers between the suspension eye and the chassis.
Then I found that I could put a lever in under the chassis and over the bottom wishbone, and push it down with my knee while I waggled the damper out -
it's a very close fit but it just comes out!
With the damper out, I adjusted the height of the base plate on the new damper to approximately the same place (same spring length) as the old one, then set
the firmness to 18 clicks from full hard (full range hard to soft is 40 clicks so I am slightly firmer than the average (so to speak!).
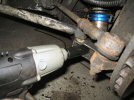 Then, as the best Haynes manual says, refitting is the reverse of removal. I found it easier to fit the bottom end first because it needs a fair bit of
waggling to get the eye into the chassis and lined yuo, so that you can then knock the bolt through from behind. I used my magic power wrench to spin the
nuts on.
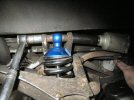 Then refit the top damper bolt, with its spacers.
Then refit the drag link, line it up and refit the bolt and washers.
Finally, I refitted the drop link to the end of the anti-roll bar. This turned out to be a mistake, because when I came to do the second side, I discovered
that the drop link WASN'T in the way of the damper bolt.
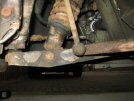 Here's the nearside, photographed from the rear. You can see the lower damper bolt and the drop link at an angle and well clear of the bolt.
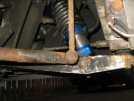 Now here's the offside, and you can see that the lower damper bolt is behind the drop link. Bloody TVR - not only is every car different, but one side is
different from the other...
What seems to have happened is that the anti-roll bar has been fitted about a half-inch off-centre, so the drop links are at slightly different angles. It
shouldn't make a big difference, because the bar doesn't affect the suspension geometry (as it does on a Ford for example) but I'll have to try loosening
the clamps and centralising it.
For now though, I thought my luck was in when I didn't have to remove the drop link - but then I discovered that I couldn't push the wishbone down far
enough to get the damper out, so I would have to disconnect it after all. But all is not lost - the anti-roll bar is fixed to the chassis so that it can
twist, so it should be ok if I disconnect the other side again - that should come off easier seeing as I've just had it in bits, and should let it twist
enough. And it does!
I tighten up all the bolts, and replace the wheels, and then set off for a wee test drive (that takes an hour! Well you have to, dontcha?). The car
certainly seems firmer but I can't check how it handles because the roads are damp and I'm a wuss. When I get back, I check the ride height, which seems ok.
I was also going to do the brake disks but I decided to do one step at a time.
:: Tuesday, January 26, 2010 ::
Decided today to change the brake disks. Famous last words - how hard can it be?
Jack the car up, take the wheel off, take the pads out of the caliper, remove the caliper from the upright and hang it from the wishbone on a bit of wire.
Easy peasy.
Now the disk should just slip off the hub. Except it's held on with 10 years of rust and it's not for moving. At all.
The problem is that the inside of the disk bell is really rusty, so the inside diameter is smaller than it was when it went over the hub, so the hub flange
doesn't want to come back out of the rear.
Covered the back of the hub in plus gas, then spent an hour with a 4 pound hammer, hitting one front brake disk to get it off. Hit - turn - hit - turn -
hit etc etc. There's limited room to get a swing at it under the wheelarch.
I hit it until my arm is nearly dropping off - it's moving, it's past the edge of the hub, but it's still as tight as a wossname. I had to stop because as
I had a doctor's appointment (not because of the exertion, the appointment was there already!) so I'm going to go back to it later. But not today
The best advice I get on Pistonheads is to take it to a garage and use the hammer on the wife if she complains about the bill. Laterl thinking - I like that.
:: Saturday, January 30, 2010 ::
Back to the brake disk. I set up a gas blowlamp in a wee stand pointing at the hub, and then slowly rotate the disk (with work gloves on - I'm learning!)
until the hub bit is hot. It's such a huge lump of iron, though, that the heat soaks away in no time, but it definitely helps - after a bit more heating
and hammering, the disk is definitely coming off! So is my arm, but we'll persevere eh? Then it's off!
I use a flap wheel in a drill to clean up the edge of the hub flange, and then apply lashings of copper grease to the inside of the disk flange, and the
face and edges of the hub, making sure there's no grit trapped that might prevent the disk from sitting flush.
Then it's disk on, caliper on, pads back in after smearing the edges of the pistons and the rear of the pads with more copper grease, and then wheel back
on - done!
Now for the other side, and I decide that the problem I was having on the first side was that as I hammered one point, the disk was swivelling about its
centre so the other side was going back on a little bit. Even although I was rotating the disk as I hammered, I was spending a lot of effort to get back
to where the disk had been last time, because the disk was changing its angle all the time, if you see what I mean.
So this time, I decide on the appliance of science (and a fair degree of laziness and shoulder ache) and put a big gear puller on (didn't take a photo
sorry) and then tightened it up. Although it wouldn't pull the disk off, it did mean that once you'd hammered it off a bit, it stayed there - then tighten
up the puller, hammer it off another wee bit, tighten again etc.
So they're off, and nobody got hurt. Well my neighbour might have been when he came out to put stuff in his bin, if he overheard the more colourful end
of the range of popular swear words.
I've reassembled one side and have still to put the caliper back on the second side, but it's nearly there!
:: Sunday, January 31, 2010 ::
It doesn't take very long to refit the second disk as I did yesterday, then I decide that because it's sunny (but cold) so a wee drive is in order.
Needs a wee bit of help with the starting from cold, but then it's fine - it's running like a nippy sweetie. I make sure to try the brakes several times,
to bring the pads back up to the disk, before I really need them!
I hear a slight whine from the left hand side, that was there before - it sounds like a wheel bearing, but I didn't feel any sign of a problem when I had
the front disk off - maybe it's the back? I wanted to see if changing the disk changed the sound, but it hasn't. More investigation required!
The temperature is moving about a bit, as if it needs to be bled properly - although it doesn't overheat despit a slow bit through two towns.

 I parked the Lexus outside the garage on 18 December, when the snow first came on. It hasn't moved since (although I did, somewhat optimistically, clear the
snow off it but didn't go anywhere before it snowed again). The Fiesta is Miss Git's, and that's been out twice in that time (with me driving it...)


